Wednesday, December 13, 2017

Multiple Windows 10 Remote Server Administration Tools (RSAT) in ConfigMgr

When you do an in-place upgrade of Windows to Windows 10 Feature Release whatever it removes the RSAT tools and you have to re-install. Instead of our IT staff going to download it every time, I put it into SCCM as an available advertisement to our IT staff. I followed this post by Nicolas Pilon @ SystemCenterDudes over it and it has worked great until Feature Release 1709 (16299) came out.

Microsoft has a specific version of RSAT for 1709 and you use the previous (same link!) Windows Server 2016 release for older versions of Windows 10. This presented a small issue that was addressed with multiple Deplyoment Types for the Application.

First step is to create a Global Condition for the Windows 10 Build version for which Jörgen Nilsson @ CCMExec covers. This actually will be useful for other tasks around Windows 10 and technically will pull the build for any version but is only really relevant on Windows 10 platforms.


Then in the Application we have two Deployment Types (no 32-Bit here!). One for less then 1709 and one for 1709.


For each we use two requirements set appropriatly.

  • Device | Operating System
  • Custom | Windows 10 Build Number

For the 1709 deployment type, our requirements are Windows 10 and Build equals 16299. Note the detection version of ServerManager.exe 10.0.16299.2 as of this writing.


For the older versions, it is also Windows 10 but also Server 2016 and not equals Build 16299


To keep it simpler each MSU is in a seperate folder source so when 1803 (whatever the next one is called) its easy to add or change. Maybe Microsoft will make RSAT version agnostic.

-Kevin

Wednesday, December 6, 2017

WSUS Additional Update Views for Windows 10

I was helping a friend with his WSUS and understanding all the Windows 10 upgrade options available within it once you select the Upgrade classification. I created a few Update views and he was amazed about it as he didn't know that could be done so I thought I would share how I did it.This works fine for WSUS upstream of a SUP in ConfigMgr also however it does not go downstream to the ConfigMgr console so is not really useful in that scenario.

In the WSUS console, just right click Updates and select New Update View and set it up.


In the above example I created the bottom three for specific scenarios in his environment. For Windows 10 elsewhere, I broke them out further based on Windows 10 feature updates or upgrades for Windows 7 and 8.1.


For the Windows 10 Feature Updates view configure as following:


And finally for the Windows 10 Upgrade view, configure as following. Note the legacy OS' products which you will need to have it pulling the meta data for. While the Upgrades classification is (currently) used to get TO Windows 10, it does not apply to the Windows 10 product only.


The above 7 and 8.1 upgrades get approved for a specific Computer group and GPO reflects that so the legacy versions of Windows do not get updated and potentially get out of license compliance. Seems to work well. Now if I can only figure out why there are always two Feature updates for each release. One will show under status that computers need it and the other do not. All my WSUS  servers show it, even the upstream for SUP.


Monday, December 4, 2017

Re-create ConfigMgr SSRS Stock Reports

After we updated to Current Branch 1706 we noticed some of the built-in reports were missing. Either from the SSRS site or in the console (\Monitoring\Overview\Reporting\Reports). Dont know if it was from the 1706 update itself or on of my techs accidently wacking them.

There is a really simple method to cause it to recreate them all as well as the bonus of  correcting the security settings on them. Open the registry on the server with the Reporting Services Role installed and navigate to  HKEY_Local_Machine\Software\Microsoft\SMS\SRSRP and change the SRSInitializeState REG_DWORD from 1 to 0. This will cause ConfigMgr to create all the default reports and permissions. This only touches the CONFIGMGR_SITECODE folder and does not touch any custom reports you made with report builder etc.

After a couple minutes, you can watch this activity in srsrp.log (located in the SCCM install path log folder on the Reporting Services Server) and ReportServerService_DATESTAMP.log (located in the install for SSRS such as <D:\Program Files\Microsoft SQL Server\MSRS12.SQL2014\Reporting Services\LogFiles>)

-Kevin

Monday, October 30, 2017

System Reserved Drive Letter Compliance Baseline


We have a scenario where the System Reserved Volume (S: usually) still retains its drive letter assignment after deployment. In trying to resolve we noticed several systems post deployment (months) that still have the Reserved Drive letter present. While we are still trying to find the root cause during a Task Sequence, its hard to track down. We can image a system and its present, clean it and do it again and it will not be there.

So as a resolution we are using a baseline to remove the letter assignment if found. I will not cover creating a baseline here but will show the relevant parts. To begin with we have to setup the detection using this PowerShell:

 $SysReservedDrive = Get-WmiObject win32_volume -filter "Label = 'System Reserved'" | select -property "DriveLetter"   
 $DriveLetter = $SysReservedDrive.DriveLetter  
 IF([string]::IsNullOrEmpty($DriveLetter)) {        
   Write-Host "Compliant"        
 } else {        
   Write-Host "Non-Compliant"        
 }  

Then for Remediation we use this PS1.

 $commands=@('List Volume')  
 $commands | diskpart  
 $results = $commands | diskpart  
 Foreach ($line in $results){  
 if ($line -match "System Rese"){  
 $POS = $line.IndexOf("System")  
 $line = $line.substring(0,$pos)  
 $Array = $line.split(" ",[System.StringSplitOptions]::RemoveEmptyEntries)  
 $NumElements = $Array.count  
 foreach ($element in $array){  
 $VolNum = $line.split(" ",[System.StringSplitOptions]::RemoveEmptyEntries)[-2]  
 $DriveLtr = $line.split(" ",[System.StringSplitOptions]::RemoveEmptyEntries)[-1]  
   }  
 }  
 }  
 $commands=@(  
   "Select Volume $VolNum",  
   "Remove Letter=$driveLtr"  
   )  
   $commands | diskpart  

Pretty easy, on the compliance condition just set it so the value = Compliant.


We advertise the baseline to a collection holding all workstations in it and set to Windows 7 and up to run daily. This way if there is a legit reason for IT staff to attach a drive letter assignment they can finish their task before the baseline remedies it.


Wednesday, September 27, 2017

Change Windows 10 Edition with ConfigMgr


I dont know how I missed this recently, but this a great feature that I have history around. Simply put, ConfigMgr lets you change the Windows 10 Edition. This is pretty exciting for those of us with Software Assurance for the Workstation OS.

Around the Vista and 7 timeframe, my firm renewed our EA to include Enterprise Edition so I of course wanted to change from Professional to Enterprise on the existing systems to use those features. Easier said then done. On the consumer side, Microsoft had Windows Anytime Upgrade where you can go from Home all the way up to Ultimate, however on the corporate side not anything easy. A software refresh was the official solution after several conversations including with Michael Niehaus. While the pirates figured it out, but I could not really use that process at my firm. So we used attrition to get us over to Enterprise back then.

Fast forward to today and it is so much easier. Much work has been done by Microsoft to allow easier switching of corporate editions starting in Windows 8 with yet more improvements in Windows 10 today. With Windows 10 (1607) you can change the (KMS) key of a Professional install to Enterprise and without restarting your instance it is now Enterprise with all those features. Future changes look to change the edition when you first log in to the system!

They took it one step further by having ConfigMgr do this for you in at least 1606 Current Branch via a compliance setting. You can uplift to several higher editions.


In my environment we track everything via SCCM and have all sorts of Windows 10 collections and we actually have a few Professional Editions for whatever reason. So this will be deployed to that Professional Collection only.


Setup is simple, just navigate to \Assets and Compliance\Overview\Compliance Settings\Windows 10 Edition Upgrade in the SCCM console. Right click and select Create Edition Upgrade Policy.


Being a large Enterprise, we use ADBA for license provisioning so I entered a KMS key but you can use your firms MAK if you prefer. Microsoft provides the KMS client keys here. The screenshot is the Enterprise KMS so steal away.

After selecting Next you deploy this like any other complance setting by right clicking it and selecting Deploy.


All Done. I went from a few dozen Professional down to 1 quickly. I'll have to look at the one at some point.

-Kevin


Saturday, September 23, 2017

Domain re-join shortcut trick

We've all had it. A system with domain authentication issues. Usually it's the Secure Channel.


or way back


 but sometimes it's worse like the machine object being "accidentally" deleted.

For me to resolve these, I just log in with cached credentials and run some PowerShell like

 Test-ComputerSecureChannel -repair  

You can add "-cred "MYCOMPANY\username" if your password changed by then or if you have to use a different one that has rights.

or in the worse case when the object is not present

 add-computer -Domainname domain.mycompany.com –cred “MYCOMPANY\kevin.fason”  

Many of my techs do not like CLI and have to use the mouse.  The accepted way is to remove it from the domain and make it a member of a workgroup, then join back to the domain with reboots in between and enabling a local admin account etc.

Instead of going through all that, did you know you can just enter the NetBIOS name of the domain? The system perceives this as you moving the system from one domain to another, even though its technically the same one, your just using the legacy NetBIOS name vs the FQDN of the domain.

Here is an example normally showing the FQDN of the domain:


Just change it to the NetBIOS and select OK. One reboot. all done. After the reboot it will revert to the FQDN domain name.


If you do not know what it is you can open a command/powershell prompt and type 'set USER' and it will tell both names via the USERDNSDOMAIN (FQDN)and USERDOMAIN (NetBIOS) variables. 

Or if you must use that mouse, you can open ADUC, right-click the domain, and select properties. Right on the general tab you will see it listed under 'Domain name (pre-Windows 2000).

Who knows how long this will work as forest/domain functional levels are uplifted.


Thursday, July 27, 2017

ConfigMgr Upgrade Readiness Connector Setup


NOTE 07.27.2017 - I thought I posted this a while back so hopefully the steps and screenshots are still valid. I'll go validate when I have some time.

---

We are using Windows Upgrade Readiness to accelerate our transition from our legacy versions of Windows to 10 v1607. As we recently updated ConfigMgr to 1610 I wanted to make use of the connector available in SCCM for it.

To give a brief overview, we have the Readiness Scripts Deployment folder (with our info) in an SCCM package with the deployment set to run the BAT file. The deployment has a recurring assignment schedule to run once a month, the week before our monthly patch cycle. Its ran on all workstation OS' including Windows 10) as it is expected to be used well past our 7/8.1 migration to 10 but also from one build version to another in Windows 10 itself as Readiness lets you pick the destination version to work against. Quite handy. Definitely keep up on the teams blog if you use it and the team itself is great with communication and interaction with the world. I've had great conversations with them over this offering.

Here is a sample of the end result that you can see in the ConfigMgr console.I'll cover this more later.


So for the setup of the connector, the documentation was a bit more generic then I would have liked, especially around the OMS and Azure bits, so I did struggle a little on it so here is how I set it up. There are three basic steps to it:

  1. Create an Application in Azure for SCCM to use, think of it as the username/password
  2. Enable permissions to the OMS instance Upgrade Readiness is in
  3. Setup the ConfigMgr to Windows Upgrade Readiness connector

This assumes you have Readiness already setup in OMS. I prefer the older manage web console to the newer portal one so thats where I perform the first step.


Step 1


Log in to the Manage portal and navigate to Active Directory on the left pane. Then click on your AD instance under name.


After that you select APPLICATIONS at the top


Then select Add at the bottom


Choose Add an Application my organization is developing


Give it a useful name such as ConfigMgrUpgradeReadiness and click on the right arrow.


Now you have to create two URLs, neither of which are used so enter whatever you want


Now you can create the Client ID and key that ConfigMgr uses to pull data. You can think of this as the username and password that ConfigMgr uses.

Select your newly created Application and click Configure at the top. This takes you to its customization.


Two parts here. First is  to copy the CLIENT ID somewhere as you will need it. Second is to select the duration of the key as 1 or 2 years. Once saved it will show you the key. you will want to copy the key as well. I would suggest you retain the client ID and key somewhere such as a password manager as you may need it long term. If not then you have to come back here and generate a new one.


Note that you only get ONE opportunity to copy the key. Once you leave this page the key will not be shown (as above) and you will have to generate a new one. You are now done with overall step 1.


Step 2


For step two you need to give this app the correct permissions. This was removed from the manage portal a while ago so over to the new portal. Select Resource Groups on the left pane.

As shown below you will select the Resource Group the Upgrade Readiness is located in (mms-eus in this example) then Access Control (IAM) on page 2 and finally +Add on page 3.


You will then select or search for the name of the Azure AD app you created earlier and grant it Contributor rights. This was my struggle. I originally thought you had to give rights to the domain SCCM service account thinking it was what ConfigMgr accessed OMS with. This is shown above highlighted in yellow.

Step 2 is complete and its onto Step 3, setting up the connector in ConfigMgr.

Step 3


For this you goto the SCCM Console and navigate to \Administration\Overview\Cloud Services\Upgrade Analytics Connector. Note it has not been updated to 'Readiness' yet.


Simply right click Upgrade Analytics Connector and choose Create Connection to Upgrade Analytics.

Enter the relevant information you saved from step 1 above which is the Client ID and secret key along with your Azure Tenant name, generally mycompany.onmicrosoft.com. Once done select Verify then Next.


Note this screenshot is AFTER I already entered it and you'll see the Client secret key: field is blank. If you ever go into here you will have to re-enter the key. You remembered to save it right?

If you setup the permissions correct you will be shown with the required information. This screenshot is post setup also.


Thats it., SCCM will now pull from Windows Upgrade Readiness. You can view information about it in the DMPDownloader.log located in your SCCMInstallFolder\Logs. While I suggest you save the key and Client ID somewhere, it is located in this log file but the logs may have rotated by the time you need either of them.

This is a sample of a normal run. The last line I do not like and wish it could be changed. Upgrade Readiness updates daily, however SCCM will download from it only once a week (10080 minutes) so your data is that old.


Final Thoughts


Once it has imported into SCCM you can act on it. Just goto \Monitoring\Overview\Upgrade Analytics. Per my initial screenshot, it shows readiness information for the All Workstations collection I've created. Just select any collections in your environment that are device based to work against.


At the bottom you can select the pull down and create collections based on the "buckets" that are in Upgrade Readiness. I have created several that in turn have the in-place TS advertised to them as available. It does create these with 'All Systems' as the limiting collection so I have changed that to use more appropriate ones to coordinate with any implementation schedules.

My firm has a small team that spends time every few days in the Upgrade Readiness OMS website so as systems are marked as ready in the Readiness tool then flows via the connector into ConfigMgr Collections to get Windows 10 in-place advertised to that endpoint as being available. Awesome right?

I created a UserVoice to request the 10800 min interval (week) be changed to a day or allowed to be configured. This makes more sense as the Analytics updates daily.

-Kevin

Monday, July 24, 2017

ESXi Windows Server Backup Tool Bare Metal Restore

I have a small single host ESXi on a Dell PowerEdge R710 (popular for homelab) that I support for family. It has all the normal stuff on it:

  • Windows Domain Controller with DHCP
  • Windows Domain Controller
  • General Purpose server for WSUS, MDT and what not. 
  • Multiple MDT Build and Capture 
  • Multiple Windows 10 Insider Preview
  • ???

All normal homelab stuff. Recently there was a power loss event, that while it lasted only a few minutes; and should not have been noticed, hadcaused the battery in the UPS that protects this host to blow up, literally, so all the VMs and the host went down hard.

There is an physical Ubuntu Linux server and network equipment that is on a different (matching) UPS and it controls both UPS' so if a power loss happens it will SSH into the ESXi host and pause the VMs and shut it down gracefully if needed. Sooooooo did not plan for batteries exploding.

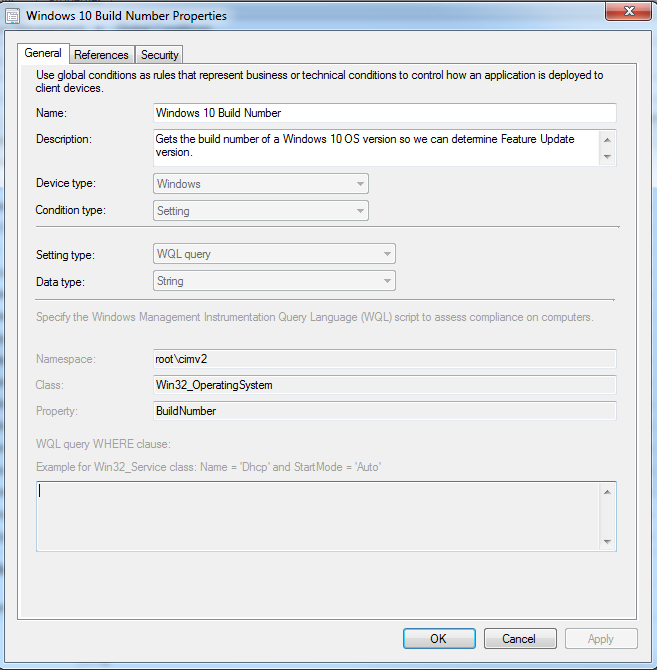
While we recently bought VMWare vSphere Essentials, which gives us the backup API, its not in use just yet. When both the host and the VMs were setup it used the free license so everything else used free options. Therefore to protect the "critical" Windows Server VMs, we used the built in Windows Server backup tool and did a daily Full Server backup. These are sent to a UNC path on the above Linux server as it has lots of space and is external. Due to limitations in the built in backup software only a single full backup is done so no incremental.

So upon bypassing the UPS and bringing the host and VMs back up, one of the Domain Controllers was not happy and kept blue screening and in a restart loop.


Solutions on this error were to go through Directory Services Repair Mode. Thankfully this was the DC that is only a DC, no FSMO roles or duties so was pretty disposable. Since the backup is ran daily it was less then 24 hours old I decided to do a bare metal restore instead since its been a while since I did a restore exorcise.

First step was to shut it down and take a snapshop so I can revert and go the Repair Mode route if I chose to. Then boot the VM from the 2012R2 Install ISO.

Select Next on the initial dialog


Then Repair your computer at the bottom


then Troubleshoot


and then finally System Image Recovery


Since my backup is not local and on a Linux server it will error out so we need to get connected to Samba on the Linux box.


Choose Cancel to close this dialog then select Next to proceed


Then you click on Advanced... so you can enter a UNC path.


Here you would locate a backup on the network, however the second option reminded me that I used VMXNET3 for the NIC on this VM and the driver is not in the 2012 R2 install media since its installed by the VMWare Tools. 


If you try to attach to the UNC path you will just get an error since there is no NIC present in this PE instance. You can verify further by going to a Command Prompt in Advanced Options and using ipconfig etc.


previously wrote on where to source the drivers but that meant getting a source (floppy or CD) mounted on this broken VM. There is a simpler solution for ESXi. I edited the VM and added a second NIC that is supported by the media, which in this case is an E1000e.


After giving a few seconds for DHCP to kick in I selected Back until I could select Advanced... again then select Search for a system image on the network which then asks if you want to bring the network up.


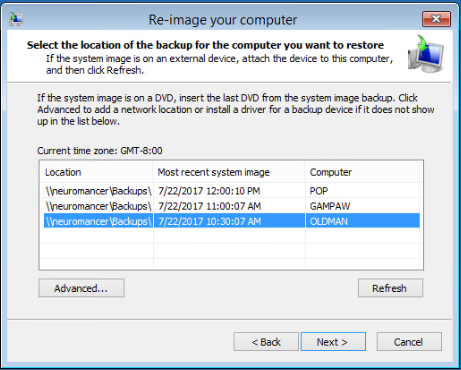
Select yes and enter the UNC to your backups


and of course credentials to get at the backups


Now we have all our Server Backups so we can select the one we want and then Next 


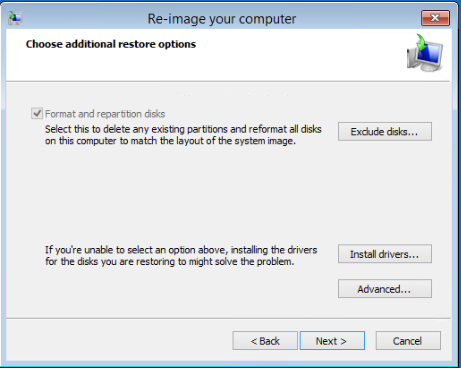
It then asks us which volumes to restore. Since its a DC and only has the one so we select it and Next again.


Since it is bare-metal and going to the same "hardware" you just need to select Next here as we have nothing to change.


And now we are at the confirmation dialog. Finally! Just have to select Finish and let it restore.


Nope, still one more dialog to be sure we are REALLY ready to restore. Select Yes.


Away it goes.


This is weird. Got an error on the restore. I would get this error again each time I tried but in different spots so the backup seemed good to me still.


This is such a generic error I thought it may be NIC related so I went back to ESXi and created a small drive on the multipurpose Server VM


and then copied the backup to it. Note you need to create a folder in the root called WindowsImageBackup then place the systems backup folder in it. Once completed, I unmounted it from that VM and mounted to this broken VM


and ran through the wizard again. All live, the PE instance was seeing all the hardware changes I was making. This time the wizard found it at the beginning since it was local to the VM so I did not have to go through Advanced like before.


After selecting Next you are taken to the Choose additional restore options dialog and its the same from there on out like above, just no errors this time!


Once complete it restarted and the restored server booted back up in its earlier state.


I did however interrupt the restart and unmounted the restore volume and deleted the e1000e NIC I attached. I looked at the event logs to make sure AD replication was happy and then after a couple days I removed the snapshot I took in the beginning. 

Without the ESXi parts at play, Windows Server backup can be a free yet powerful tool to backup servers and restore them. On physical hardware you could copy the backup to a USB if you had the same NIC issues.

Now to work a process around exploding UPS batteries. As a preventative measure, I did copy out the same day backups of the other two servers in case they had this happen but am happy to say they have been running great since this incident happened several weeks ago. Until I have time to research free ESXi backup options that work with my VMWare Essentials license I have added these backups to my rsnapshot.conf on the Linux box to get quasi incremental backups.

-Kevin