Monday, December 14, 2015

Downgrade Office 365 2013

As mentioned previously, we use O365 Pro Plus Click-to-Run and control its update process via DFS and SCCM. We ran into some trouble recently with 15.0.4771.1003 causing Outlook and Skype for Business crashing. Both our PTG and TEST groups were on this buggy version since it was being tested before PROD rollout and we needed to downgrade them to 15.0.4763.1003 that was in PROD which worked fine. The TEST group consisted of IT and other key groups, including our helpdesk who uses Skype for Business so they had a rough time.

Per KB2770432 you can revert by running 'officec2rclient.exe /update user updatetoversion=15.0.xxxx.yyyy' as long as that version is in the O365 install path it knows about in the registry. Easy enough, however there are two minor things at play so I wrote a simple BAT file that we pushed out via ConfigMgr.

One, as I mentioned previously we use a baseline in ConfigMgr to set the install path in the registry. Different groups are on different versions so first we had to disable the baseline for a while. We could have changed the path related in the baseline, but that would have taken longer to process so we chose to change it on the fly in the script.

Two, is the arch of the Operating System. Even though you are using the 32-Bit arch of Office 365 yet you are using the 64-Bit arch of Windows the path to officec2rclient.exe is different so we had to address that execution.

First is the determination of what arch of the Operating System we are using.

 :: Check OS Architecture and run correct version of downgrade app  
 :CheckOS Arch  
 IF EXIST "%PROGRAMFILES(X86)%" (GOTO 64BIT) ELSE (GOTO 32BIT)  

Once that was determined, we just run the relevant version of the tool while passing the version we want to change to.

 :64BIT  
 %WINDIR%\sysnative\reg.exe add "HKLM\SOFTWARE\Microsoft\Office\15.0\ClickToRun\Configuration" /v "UpdateUrl" /t REG_SZ /d "\\my.company.com\path\to\files" /f  
 "%ProgramW6432%\Microsoft Office 15\ClientX64\officec2rclient.exe" /update user updatetoversion=%1  
 GOTO END  
 :32BIT  
 %WINDIR%\system32\reg.exe add "HKLM\SOFTWARE\Microsoft\Office\15.0\ClickToRun\Configuration" /v "UpdateUrl" /t REG_SZ /d ""\\my.company.com\path\to\files" /f  
 "%programfiles%\Microsoft Office 15\ClientX86\officec2rclient.exe" /update user updatetoversion=%1  

Not so fast there buddy. ConfigMgr runs a script in 32-Bit environment so we had to use the %ProgramW6432% system variable vs %ProgramFiles% on 64-Bit Windows. You can see this if you run CMD from both %WINDIR%\System32 and %WINDIR%\SysWow64. The path for %ProgramFiles% will be different depending which arch your running out of. Also of note, on a 64-Bit system, 32-Bit O365 C2R is installed under %ProgramFiles% and not %ProgramFiles(x86)% as expected.

The script changed the path in the registry to the location of the version we wanted and then ran the tool to downgrade it. After pushing it out we transitioned just under two thousand impacted systems within a few hours. The way its written, we just advertise it and update the exe to run with the version we want moved to. Once a new version came out we just re-enabled the baseline for TEST and PTG and they got the recently released 15.0.4779.1002 that is supposed to fix the problem with these two applications.

Couple changes would facilitate this working in 2016 version of Office 365 Click-to-Run as well since the registry path and the file system path have changed.

Download

This script is provided as-is, no warranty is provided or implied.The author is NOT responsible for any damages or data loss that may occur through the use of this script.  Always test, test, test before rolling anything into a production environment.

You can find the downgrade script here.


-Kevin Fason


Wednesday, November 25, 2015

UPN Normalization Phase II

Overview


NOTE: I wrote this in early 2014 however I did not publish it until now.

This is a followup to my earlier entry about normalizing the UPN for moving to Office365. This entry covers Phase II which changes the prefix of the UPN, whereas Phase I was to fix the suffix domain of the UPN.

This script will walk AD and change the prefix from whatever it is now to a standard. It looks at the primary SMTP address attribute and uses that as the source to set the UPN. This way the UPN and primary SMTP match best they can. In my environment we do have several people who instead of having @mycompany.com they have @mycompany.com.countrycode as their email domain. This pulls just the prefix from that attribute.

Solution


You will need to modify lines 2, 12, 29, and 30.

Line 2 is a limit to how many changes per run to make. I would run the script every day and let it change 5000 at a time. During initial test runs I was doing about 100 at a time.

Line 12 will need the LDAP query updated for your domain.

Line 28 and 29 just need @mycompany.com to be set to your domain from Phase I.

You can also comment out line 36 to do a test run.

When ran, it will spit out a log file in the scripts directory stating what it did as shown below.

 Updating [email protected] to [email protected]  
 Updating [email protected] to [email protected]  
 Updating johno'[email protected] to [email protected]  


Download

This script is provided as-is, no warranty is provided or implied.The author is NOT responsible for any damages or data loss that may occur through the use of this script.  Always test, test, test before rolling anything into a production environment.

You can find Cory's Phase II script here


-Kevin Fason

Monday, November 16, 2015

Static IP in SCCM Task Sequence

Overview


There have been some scenarios were we have to set a static IP for imaging as we don't have DHCP on that VLAN. MDT does this automatically, however SCCM does not so we came up with a way of handling this scenario.


Solution


This script below is ran very early in the TS, anywhere before the first restart really. It will take the data entered on the Wizard and create variables for the settings so its used later. It also will log it out.

NOTE: I don't recall if I had this written or if it came from another source. Credit where credit is due if its yours.

When you boot up the OSD PE you can select 'Configure Network Settings' on the initial wizard and enter in relevant network information. I would suggest you just do the first interface. This script will in turn populate the following built in variables (complete list) that are used by the TS engine. 


  • OSDAdapter0DNSServerList:x.x.x.x
  • OSDAdapter0EnableDHCP:False
  • OSDAdapter0Gateways:x.x.x.x
  • OSDAdapter0IPAddressList:x.x.x.x
  • OSDAdapter0SubnetMask:x.x.x.x

I would advise to only use the first NIC as some TS parts do not support multiple NICs so those can get setup later. Servers usually have NIC teaming once its deployed so that has to be setup post deployment.

just create a step that runs 'cscript.exe SetStaticIPInTaskSequence.vbs' from the package its in.


Download

This script is provided as-is, no warranty is provided or implied.The author is NOT responsible for any damages or data loss that may occur through the use of this script.  Always test, test, test before rolling anything into a production environment.

You can find the static IP script here.


Wednesday, November 11, 2015

UPN Normalization Phase I

Overview


NOTE: I wrote this in early 2014 however I did not publish it until now.

So we are taking the leap into Cloud with Office 365. My focus has been on the EFSS (Enterprise File Synchronization and Sharing) space. In this case OneDrive for Business (ODFB) which is part of SharePoint Online in the Office 365 suite. This posting is the beginning of what I am calling the normalization of UPN. The UPN is one way to authenticate for Microsoft resources such as logging into a workstation or the Office 365 service in this post. The other being the traditional down-level method. As others in my firm look to Exchange Online and Skype for Business Online, I will have done a huge part of the prep work for their endeavors.

Issue

So whats the issue?  In my AD investigation I found over 14 different syntaxes for the UPN. Some examples being:
Most of this is due to automated migration tools such as ADMT. Simply put, our users would be SO confused on what to use to access Office365 resources like ODFB. So we had to fix this and normalize everyone to follow the same syntax. The easiest was to do samAccount@ForestRootDomain however this ran into conflict with our SIP plans. 

Per MS documentation, they suggest the UPN match the primary SMTP address attribute. Being an international firm we do business not only as @mycompany.com but also as @mycompany.countrycode in certain countries so the primary SMTP address doesn't necessarily match the Forest Domain. While we could add all these other domains (around 100 SMTP domains for us) via ADDT, I chose to keep the UPN matched to the Forest root Domain syntax after internal conversations.

So with that said, I chose to break this project into phases with the first phase to fix the domain suffix, while the second is to normalize the prefix and subsequent phases to look at things like the SIP address. This post covers Phase I.

Resolution

There are several scripts out there that act as a broad sword to forcibly change every user objects UPN, but with our size and AD organization I needed a steady handed brain surgeon as we have non named user objects such as service accounts that should not be changed and are really outside the scope of this project. Nor do they need to take an Office365 license. Therefore we had to target specific user objects for this change.

Step One

I took ADFind and exported all the users relevant fields.

 adfind -csv -t 500 -h LOCALDC.my.domain.com -b "dc=my,dc=domain,dc=com" -f "&((objectcategory=person)(objectclass=user))" -nodn samaccountname userPrincipalName employeeID sn givenname name >> prod_List.CSV  

In the ADUC GUI, UPN is broken into the prefix and suffix however it technically is one attribute so the easiest way to deal with that is to break the UPN into two separate columns for quick sorting. I used PSPAD, but any text editor like notepad, works fine as well as scripting it. Open the .CSV and do a search for

 @  

and replace with

 ","  

Note you will need the quotes as ADFind escapes each column with quote and it can mess up the next step. Additionally if you have objects that legitimately has the @ sign in the UPN those objects will look all quirky and need more manual work.

Step Two

Import the CSV file into your favorite spreadsheet program like Excel and sort by column C (domain suffix). Then delete the correct record rows leaving only the ones needing to be changed. Save this out as an XLSX file.

Step Three

I had Cory Becht do his magic yet again and throw together a script much more eloquent them my attempt. It will look at the XLSX file and parse the samaccount from the first column and change the UPN domain suffix to what you set in the script. The other columns are just for sorting and verification. You will need to modify lines 29, 35, and 38 in Cory's script for your environment.

Download

This script is provided as-is, no warranty is provided or implied.The author is NOT responsible for any damages or data loss that may occur through the use of this script.  Always test, test, test before rolling anything into a production environment.

You can find my ADFind script and Cory's script to change them here. You just need to grab ADFind from Joeware and put in the same dir as these two.


Thursday, October 8, 2015

Random MSIExec Panics during Task Sequence caused by Office 365 ProPlus Click-to-run

In a previous posting I laid out how we are keeping Office365 ProPlus Click-to-Run (C2R) up to date using DFS and Baselines. Turns out that a problem arose from the Suite's update mechanism. To save deployment time we use a hybrid image so it has patches etc. We formally had the Office 2013 MSI install in this WIM and followed suit when we transitioned to C2R. It had the added benefit of our WIM being smaller

The 'Office Automatic Updates' Scheduled Task would kick off during the deployment. This upset MSIExec to no end. We would get random install errors when a step was trying to install software. Many were 1618 but other strange ones like 1603 and 1638.

The fix we chose was super simple. I just put in a step to change the UpdateURL reg entry for the update path. This causes the scheduled task to exit since there are no updates found. Later on the baseline (see previous posting) changes it to what it should be. We looked at other options around modifying the scheduled task but this is the simplest solution. Now everything installs like it should.

 reg add "HKLM\SOFTWARE\Microsoft\Office\15.0\ClickToRun\Configuration" /v "UpdateUrl" /d "\\my.domain.com\FakePath" /f  

Note that for Office 2016 they moved this up and out of the version key.


 reg add "HKLM\SOFTWARE\Microsoft\Office\ClickToRun\Configuration" /v "UpdateUrl" /d "\\my.domain.com\FakePath" /f  

This key is put as close to after the Setup Windows and Configuration Manager step as you can. If your not using baselines or something else to manage this information you can change it back to its proper location as a final step in the TS. This should be a path that exists so there is no timeout concerns so we just went up a folder.

-Kevin Fason

Sunday, September 13, 2015

Remove deprecated Software from SUP

I have a site that they finally moved away from XP and Server 2003 and even from Office 2003 and 2007. So now I'm off to cleanup SUP and remove all this stuff. It means ConfigMgr and WSUS have less to process but even the end points will have less to process each time they check in with WSUS. The DPs have less content as well.

First thing is to remove the products from SCCM by going to the Administration pane and then Site Configuration and Sites. Right click the site and select Configure Site Components | Software Update Point. In SUP goto the Products tab and deselect all the stuff you don't have in your environment. This is a good point to do a quick audit and enable/disable other. For this site I removed Windows XP, Server 2003, Office 2003, and Office 2007.

Onto the mind numbing part! goto Software Updates on the Software Library pane. Navigate to All Software Updates. I create Software Update Groups (SUGs) for each year and the current year by month. I'd suggest you do the work per SUG as while it takes longer, its less patches being removed in one shot and allows you to quickly audit them before boredom steps in and you miss something. Plus you can stop and come back later where you left off.

With that said though, Office is small enough that I did do it at the All Software Updates level. Search for 'Office' and add criteria for Deployed = Yes and a couple titles for 2003 and 2007.


Once it finds everything, parse the list to make sure its right. If so select all and right click to 'Edit Membership' and remove from any SUGs that are checked.

You will need to rinse and repeat for all the products within those Office suites. So change 'Office' above to Excel, Word, Outlook, Access, etc. Remove membership for any of those. It should find one or two like Junk E-mail Filters.

Once that is removed goto your SUG and select the first year. In my case is was '2008 and earlier'. Do a search for 'Windows XP' with a title does not contain 'Server 2008'.


Many patches will be combo patches for multiple OS' so we have to exclude those and adding the does not contain does that. Once it pulls back a list, parse it to make sure its right and then remove these memberships. Rinse and repeat for each SUG.

Once done, you can go back to the All Software Updates and search for Windows XP and deployed and see if there are oddball ones to remove. For this site I also removed IE6 and IE7. Did I get rid of everything I could have? nope.

This work was done on a 2012 R2 SP1 CU1 site so it will take care of replication on its own. With that said I took it one step further since the less advertisements you have the better and took my 2008 and earlier and was able to merge it through 2013 removing 5 SUGs. Be sure to keep your SUGs under 1000 patches.

-Kevin Fason


Shutdown mid Task Sequence

We are working to have our hardware vendor lay our image down for us in their factories. I provide them a Stand-Alone ISO and they muck with it and stick in on the drive for deployment. The Task Sequence still processes however much of it is done before the device arrives on-premises. The software that goes on every computer, such as Adobe Reader, and even stuff targeted to say latops, like a VPN dialer is ran there. Then our HTA and any per unit customization, such as machine name, is done on-premises as well as domain join.

In order to streamline this, they have us make several changes to the Task Sequence. One is a step that runs a "secret sauce" script with two Restart steps surrounding it. This is the point in the Task Sequence that the device is boxed up and sent to its destination. Before giving the ISO to the vendor they have a checklist to test against. They ask that the NIC is disabled in the BIOS/UEFI and the process ran until this special step and press the power button during the second restart step, during POST. Once off, turn on the PC and go into the BIOS/UEFI and enable the NIC and continue the Task Sequence. This emulates both the factory process, that has zero network, and the on-premises part which does. You have to watch the Task Sequence progress and sometimes you miss it and have to start over. Its like watching paint dry at times right?

I unfortunately missed that step a couple times so I devised a dirty way to shut the machine down mid task sequence. When it was off I knew I was at that point in the testing. Two steps is all it takes.


The first just runs shutdown for 60 seconds

 shutdown.exe /s /t 60  

The second is a built in restart step that is set for 90 seconds. Be sure to set to currently installed OS.


This second step will hook the TS for the next startup and display the countdown. The first step is what does the actual shutdown. The second step timer needs to be long enough for the second step to hook the TS for next startup. On an SSD 60 and 90 worked well but slower spinners may need both steps tweaked. Once you see the countdown its hooked and all is good.

What other uses does this have? who knows, It helped me in my testing so I can multitask and not watch paint dry.

-Kevin Fason


Wednesday, July 29, 2015

Office shortcut pins migration


For deployments we don't customize the OS all that much, figured Microsoft spends X billions on the trashcan placement on the desktop so why change it up?  For Windows 7 its pretty much just adding Run and Devices and Printers to the Start menu and on 8.1 we remove icons for all the consumer stuff. We are moving our Office suite installset from Windows Installer Package (MSI) to Click-To-Run (C2R), or in other words from Office 2013 to Office 365 ProPlus. 

Even though they "look" the same (till Office 2016 anyhow) and are advertised as such theres alot underneath that is different. Different registry locations, install paths etc. One is related to the Shortcuts. While we do not pin any apps by default, many users are pinning their Office apps to the Taskbar for example. Moving from MSI to C2R changes the source path so the icons cease functioning. So to be nice to our more enlightened customers, our SCCM Admin Cory wrote this quick script to handle the pinnings so they are migrated from O2013 to O365 C2R.


Usage

Capture pinned items with the RECORD switch

 "%WINDIR%\Sysnative\Cscript.exe" PinnedItems.vbs" RECORD  

Uninstall existing office suite. however you want. This was written for O2013 but should work with older versions.
 %SYSTEMDRIVE%\MSOCache\All Users\{90150000-0011-0000-0000-0000000FF1CE}-C\setup.exe /uninstall ProPlus /config Uninstall.XML  

Restore pinned items with the ACTIVESETUP switch.

 "%WINDIR%\Sysnative\Cscript.exe" PinnedItems.vbs" ACTIVESETUP  


How it works

It just inventories all the shortcuts and then stores them in a file.  Then there is an active setup job that runs for every user who logs in to restore them to the new file path of where Office 365 is. Active Setup is very similar to Run and Run Once. It is used when your application requires installation of components such as files or registry keys on a per-user basis, but application has no advertised entry points or other triggers to initiate the installation process.


Download

This script is provided as-is, no warranty is provided or implied.The author is NOT responsible for any damages or data loss that may occur through the use of this script.  Always test, test, test before rolling anything into a production environment.

You can find the download script here.


-Kevin Fason

Friday, June 26, 2015

Windows Could Not parse or process unattend answer file for pass [specialize] in MDT

Here is an issue that took me a while to track down and resolve. Scenario is a small MDT2013 environment that has been upgraded from MDT 2012 Update 1 and MDT 2012 before that. It has a few TS but the two used mostly are to Deploy Windows 7 64-Bit and Build and Capture. 

Each quarter I do a B&C via this second TS. Nothing has changed in years for this TS. It applies install.WIM (from DVD source), disables System Restore and patches from WSUS. This image is then used in the Deploy TS as the base. So imagine my surprise when it goes through the B&C and I swap it into production and do testing and I get this informative dialog:


“NOOOOOOO” -Darth Vader

Wait, that didn't happen, I'm a despecialized camper. So I do what anyone does, rinse and repeat and create a new patched WIM. Ugg same error. Do a deploy from the previous quarter WIM and that works so nothing else was changed. Just not the new B&C WIM. What changed? Checking %WINDIR%\Panther\Unattend.XML, this section looks fine without any common problems. Parsing the panther logs didn't really pull up anything other then that there was a syntax error. Back in Unattend.XML start looking closer. Computer name is under 15 characters (its a VM that gets set to 'VMHost'), No illegal characters in the computer name, serial key is correct, CS.INI is still good, etc. I bet it was something WSUS was giving it. Hmm, back to unattend.xml to do a diff of the unattend.xml against one used for Windows 8.1 as that did a quarterly update process fine. Found one difference under specialized other then the serial key:


 <IEWelcomeMsg>false</IEWelcomeMsg>  


Deleted this line and problem solved. Took a while to diagnose and fix this issue so thought I'd share. Searching for this setting, others have encountered it and some just comment it out like this.

 <!-- <IEWelcomeMsg>false</IEWelcomeMsg> -->  

There are several ways to fix it. I just modified unattend.xml in \\MDTSERVER\DeploymentShare\Control\TaskSequenceID. I also changed each XML for each TS.


Another way is to go into the Deployment Workbench and right click your task sequence and goto the OSInfo tab and select edit unattend.xml. Wait a while for it to process as it extracts the WIM. Then use windows system image manager (WSIM) and find (ARCHITECTURE)_Microsoft-Windows-IE-InternetExplorer. Then look for IEWelcomeMsg and right click and disable "write image value", or delete it. Save the unattend and your good to go.  Or open the Unattend.XML in the Control folder directly with WSIM. It was just quicker to edit it with Notepad etc.


Looking at the MDT 2013 templates under %ProgramFiles(x86)%Microsoft Deployment Toolkit\Templates it does not have this setting so MDT 2013 will not create new TS unattends with this and this only affects existing TS created in older versions of MDT. Another reason to create a new TS and migrate steps I suppose. I do that in ConfigMgr each Release or SP and sometimes CU if I suspect it will impact built in Task Sequence steps.


Turns out what the root cause was is they moved from IE9 to IE11 by approving it in WSUS. Starting with IE10, MS deprecated this IEWelcomeMsg setting and replaced with DisableWelcomePage. Additionally, Its deprecated in Windows 8 and up. This is why I deleted it from the XML.


-Kevin Fason

Monday, April 27, 2015

ConfigMgr and Office365 Click-to-Run

Like many organizations we are migrating towards cloud offerings where it makes sense, and Office is no exception. With that said, we have begun transitioning from the MSI install of Office 2013 to  Click-to-run via Office 365 (O365). With my organization being global with lots of customization we had a choice to make in relation to updates. You have 3 basic ways of maintaining Office 365 Click-to-Run.
  1. Get Updates from Microsoft Office CDN
  2. Get Updates from local UNC Path
  3. Package as App-V
All of these methods are well documented. For us we choose the second Option (B) which gives some control over its Updates vs the other two. With the first option it was all in the hands on MS, we were not comfortable with that as we have had troubles with Office patches in the past. While we have experimented with App-V, I was concerned about using it for Office due to its footprint since its on every machine and in constant use, especially for Outlook and Lync. I see us changing to the first method long term, as rumors abound about Office 2016 Click-to-run changing the update process.

Source

First part is to get the content which is covered very well so I wont really touch on it. Simply put, you call an XML against ODT to grab the content from the Office CDN. I created a simple shell script to download it at 2AM every Monday, Wednesday and Friday and email the results. Sometimes I'll manually run it such as on Patch Tuesday. One thing I don't like about ODT is it ALWAYS downloads the latest. Already got it? Here let me download that for you again. I would like it to check and not download the current version again if it already exists locally. Next version of the script will do some revision control and other ideas I have.

This content is managed on a File Server with 32-Bit and 64-Bit together. Originally these were separate but since you state the bit level via the install XML they were merged for easier management. We maintain the last 5 versions on site.

Replication

IMO we moved back 10 years with Office 365 Updates. No SUP, WSUS, MU, etc. It updates via a scheduled task that checks 3 times a week and after login. So for arguments sake, daily. Since we chose Option B we get it from a UNC path. Being global it doesn't make sense for O365 to go across the globe to some File Server so we used DFS so its "local". Reminded of FRS replication problems from my Modular Messaging days, I chose to have ConfigMgr do replication instead of DFS. Plus, we have these SCCM Servers all over with the content so I wanted to use that. In other words, DFS namespace folder points you to the closest source and SCCM servers are the Folder Targets.

Within SCCM we have a package with the following folder Structure at its root.

 Dev   - Future Use, if you have Test, you should have Dev.
 O2013 - Some systems had their MSOCache removed so the MSI O2013 content is here
 Prod  - Production
 PTG   - Patch Testing Group
 Test  - Testing

Under each folder you have the Office\Data structure. Nothing special. Currently PTG gets the updates a month before production, basically when released by MS. To gripe, I wish MS would have Feature Updates separated from Security Updates. Its rough making a client UI change. With MS releasing Skype For Business this month, it effectively has stopped us from updating O365 until we resolve Skype For Business. If they fix a zero-day next month, we'll have to choose between that and Skype For Business.

Skype For Business was released as part of the April cycle so its located under 'Test' while the Lync team tests it out and does anything they need to do before we let it loose. With how this folder structure was done, we can add more folders for testing, or O2016 release, or ...

O365 gets its alternative update path via HKLM\SOFTWARE\Microsoft\Office\15.0\ClickToRun\Configuration\UpdateURL. This points to the UNC path for the updates source. '\\my.domain.com\Updates\O365\Prod' for example but any Namespace root will work. Since they are all in the same place, just change 'Prod' to 'Test' or whatever. This path is set initially during install by the XML. More below on that.

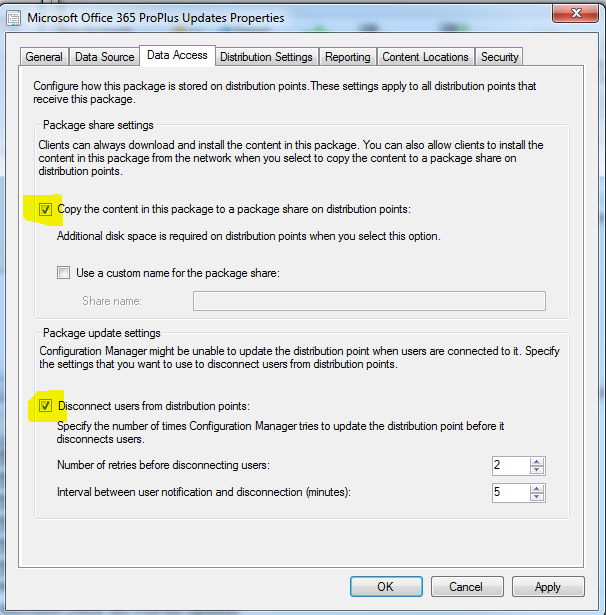
For the package, there's no programs, just content. On the Data Access tab you check the boxes so it will publish have the content outside the Content Library via UNC.


This will let it behave similar to previous SCCM versions and place the content at \\SCCMServer\SMSPKGD$, whatever D is in your case. So now for DFS you add an entry for \\SCCMServer\SMSPKGD$\PACKAGEID. We also have 1E Nomad so you can use \\SERVERNAME\NomadSHR$\PACKAGEID_Cache in that case. We now have the O365 content at all DPs and end-points can pull O365 Updates.

Configuration

You can do this, but since its SCCM, we have to automate the Updates path also! We used Compliance settings to set UpdateURL in the registry.


Each Compliance Setting is setup very similar with the only difference being the UpdateURL UNC Path.

Under Settings we have the following:


For Compliance Rules we have this one rule:


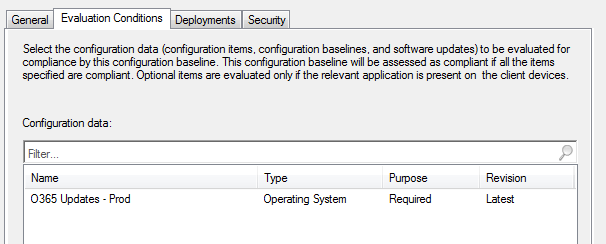
Under Relationships we point to a Configuration Baseline.


For the Baseline we have the configuration data set.


And the following for the deployment to a collection. It checks and mitigates daily.


This in turn points to some collections. These are pretty simple in that for Prod its limited to the All Workstations Collection as well as excludes the other O365 Update Collections (Test, PTG, etc) and for the other non Prod ones, they each point to an AD Group that we put user objects into. Since we have a few Citrix Server installs, those are handled as well.

WorkFlow

Now that all this is setup the management is pretty easy. The Script downloads the new version, we get email its here. We then copy the version into the appropriate folder in the package and replicate it. Thats it. Clients will update O365 on their own from here. We could automate further as needed.

Side note on the folder structure. Point the UpdateURL to the root folder that 'Office\Data' will be in. The O365 update process will navigate down. Also, the v32_version.cab (or v64_version.cab) and v32.cab (or v64.cab) are the same file and are located in the Office\Data folder. Everything else lives under the version folder.

Office 2016 Click-to-Run Beta

The current version of O2016 Beta ODT only downloads the two main stream files for each bitlevel so you will have to manually download the following files. Be sure to change the version (16.0.3823.1010 shown below) to the version of choice. The structure and naming convention is the same as for O2013 bits of O365. You'll need to take the v32_version.cab (or v64_version.cab) and rename to v32.cab (or v64.cab and put up a directory under Data.

 http://officecdn.microsoft.com/pr/64256afe-f5d9-4f86-8936-8840a6a4f5be\Office\Data\16.0.3823.1010\i640.cab  
 http://officecdn.microsoft.com/pr/64256afe-f5d9-4f86-8936-8840a6a4f5be\Office\Data\16.0.3823.1010\i320.cab  
 http://officecdn.microsoft.com/pr/64256afe-f5d9-4f86-8936-8840a6a4f5be\Office\Data\16.0.3823.1010\i321033.cab  
 http://officecdn.microsoft.com/pr/64256afe-f5d9-4f86-8936-8840a6a4f5be\Office\Data\16.0.3823.1010\i641033.cab  
 http://officecdn.microsoft.com/pr/64256afe-f5d9-4f86-8936-8840a6a4f5be\Office\Data\16.0.3823.1010\s320.cab  
 http://officecdn.microsoft.com/pr/64256afe-f5d9-4f86-8936-8840a6a4f5be\Office\Data\16.0.3823.1010\s640.cab  
 http://officecdn.microsoft.com/pr/64256afe-f5d9-4f86-8936-8840a6a4f5be\Office\Data\16.0.3823.1010\s321033.cab  
 http://officecdn.microsoft.com/pr/64256afe-f5d9-4f86-8936-8840a6a4f5be\Office\Data\16.0.3823.1010\s641033.cab  
 http://officecdn.microsoft.com/pr/64256afe-f5d9-4f86-8936-8840a6a4f5be\Office\Data\v32_16.0.3823.1010.cab  
 http://officecdn.microsoft.com/pr/64256afe-f5d9-4f86-8936-8840a6a4f5be\Office\Data\v64_16.0.3823.1010.cab  

Download

This script is provided as-is, no warranty is provided or implied.The author is NOT responsible for any damages or data loss that may occur through the use of this script.  Always test, test, test before rolling anything into a production environment.

You can find the download script along with some download XML files referenced in this post here. You will need to tweak them for your environment. Additionally, you will need to download the latest ODT from Microsoft and blat.exe for email.

-Kevin

Saturday, April 25, 2015

Driver is not applicable to any supported platform


"The selected driver is not applicable to any supported platforms."


Wait, what? We are on SCCM 2012 R2 CU3 (CU4 any day!) so we should not get something like this. Did I somehow get some secret Windows 10 drivers somehow? Lots of mis-written INF files? This is strange. 

In my last post I was talking about one time driver injection. We've moved past that as we liked the Toshiba device and decided to buy a large number of them so they need to be setup in SCCM. Initially, a Toshiba INF driver was mis-written to state it supported 64-Bit when the DLL it called for were 32-Bit only. BSOD's all around. After fixing that I still had to address this supported platform problem. While trying to import drivers we would get this error about several of them, mostly NIC drivers not being imported due to being unsupported . In the case of the Toshiba, the physical NIC did not import, however the WiFi driver imported, so after sysprep the Toshiba started imaging over the wireless interface. That was fun, I don't recommend that.

Looking at the INFs they were written in normal Intel fashion and even making some modifications to strip down to Windows 8.1 did nothing. Digging through the SCCM logs was not a ton of help either. AdminUI.Log, DriverCatalog.Log, SMSAdmin.Log, Setupapi.app.log, you name it. All just said the same thing, driver not applicable. Those actually gave an error code of 0x80070661.

Turns out the issue is due to our Site Server being on 2008 R2. Specifically with the OS. The signing in these drivers is using a newer method thats not native in 2008 R2. Microsoft released KB3025419  which states to install KB2837108 and KB2921916 to update the OS to support the newer signing method in ConfigMgr. Coincidentally both this KB and the Toshiba device came out at the same time. After applying the hotfix and restarting (not required but the KB states to do anyway) we are now able to import these newer signed drivers and image the Toshibas up successfully and quickly.

-Kevin

Friday, April 24, 2015

One Time Task Sequence Driver Injection

Its that time again, testing out new equipment. Today I am looking at the Toshiba PORTÉGÉ Z20t-B at the moment. Nice device IMO, pretty new. Traditionally we use DELL so the drivers provided via Toshiba  Laptop Builder are formatted different then the CABs that DELL Provides. While all our Task Sequences were created to be brand agnostic, we did have to create some structure to deal with another manufacture for the file system and driver store. Before that point though, I wanted to quickly image up a system to begin testing without doing the driver work in ConfigMgr. Just in case we don't like the device and have to remove drivers. This way we don't. It also allows me to image up a single random machine with our task sequence such as Apple or a white box type system.

In other words, this solution allows a tech to deploy a ‘one off’ machine and build their own driver package and drop it in the designated folder, and the imaging process would inject them and then use them.  

This howto assumes you are using USB to bootstrap the system so SCCM can deploy to it, however with PXE and Optical there are ways to do this via those methods.

On the USB thumb-drive we create a folder in the root call OneTimeDrivers. In this folder we put all the drivers for the device. Say the extracted .CAB from Dell or the extracted ZIP from Toshiba Laptop Builder.

For the Task Sequence, create a 'Run Command Line' step and put it with the Apply Drivers or Apply Driver Package steps that you use today. I do it after those as I have drivers grouped by virtual or physical then apply the Intel Chipset drivers, then the manufacturer drivers (previous posting.) 

 DISM /Image:%OSDISK%\ /Add-Driver /Driver:%_SMSTSMediaRootPath%\OneTimeDrivers /forceunsigned /recurse  

The step needs a condition. Choose 'Folder Properties' and set the path to '%_SMSTSMediaRootPath%\OneTimeDrivers'. This way it will check for the OneTimeDrivers folder and run if present.

Keep in mind you'll need to remove or rename this folder on the USB stick, otherwise it will run on equipment you don't want it to. Also of note, the variable OSDISK shown above is created from the Partition Disk step, which many people use in ConfigMgr and MDT. If you do not then you'll need to change OSDISK to where Windows is being deployed to such as 'C:\'.

For an Optical or PXE PE instance you could just do multiple folders for the first few volumes, say up to F for the condition. Unless your doing alot of volumes you should be fine. As long as the USB stick with OneTimeDrivers folder is present it will run.