Recently I was working on a BSOD issue for a new VPN client version and noticed the Windows instance would not write a memory dump and we thought that BitLocker was interfering in some way as it works fine on non-bitlocker systems but not on BitLocker systems. While that issue was something related to another part of the security suite it did point out I wanted to set up an auto-unlock for the VMs in my lab with BitLocker vs using a PIN at bootup.
Sure this will work with other hypervisors such as Hyper-V etc however my focus below is on VMWare. I have ESXi 7U2 on a Dell R720 with TrueNAS serving storage via NFS off mirrored vdevs (aka RAID10). ESXi supports passing the TPM however it supports version 2.0 and the R720 has 1.2 so I was out of luck there. I thought I could emulate using a USB stick.
First part is to get a virtual floppy disk attached to the VM that can host the recovery key files. As I have one host I am not using vCenter and just the HTML5 web portal for the ESXi host. Therefore doing this via vCenter will be slightly different. Just edit the VM and under Add other device choose Floppy Drive. In this version, I cannot add a new blank floppy but only attach a previous floppy image. Where am I going to find a clean one of those? WinImage to the rescue!
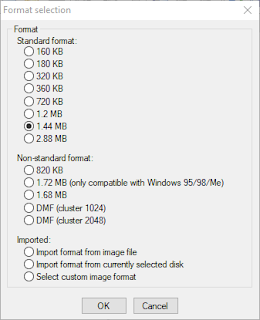
Run WinImage and select File | New then choose a 1.44MB floppy. you can pick other sizes as the Bitlocker files are really small but this is a pretty standard size.
After creation goto File | Save As and save the file somewhere. Be sure to change the Save as type to Virtual floppy image. I called mine BitlockerBlank.flp. Another reason to use 1.44 is you have a blank floppy image to use for other stuff in the future however 2.88 might be better for that, however even 720kb or 360kb would (barely) work for this use case. Upload this file to a datastore on the ESXi host. I would suggest within the VM folder itself. Or in a more secure location as you can map it from any datastore location.
Back in ESXi edit the VM and under Add other device choose Floppy Drive. Be sure that Connect at power on and/or Connect is checked.
Log into the VM and Open
gpedit.msc via Start
Navigate to Computer Configuration | Administrative Templates | Windows Components | Bitlocker Drive Encryption | Operating System Drives
Open Require additional authentication at startup
Select the Enabled radio button
Check Allow Bitlocker without compatible TPM chip. Normally you can close it at this point however in my case I also had to select Do not allow TPM under Configure TPM startup due to part of our security suite overriding it. It would error out like the checkbox was not set when I would try to enable bitlocker via the GUI or command line. Setting this resolved that.
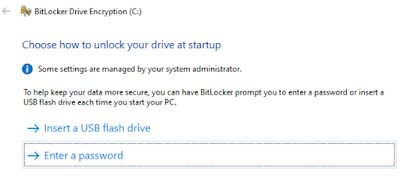
Enable bitlocker via the GUI however you prefer. During setup when it asks how to unlock your drive, choose Enter a password
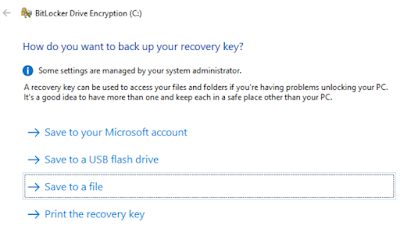
Then when asked how you want to backup your recovery key, choose Save to a file to save a recovery key file, save it to the Floppy image (A:\)
Continue the wizard as is, however, I also disable the system check but your mileage may vary. If this is an important VM take a moment and also put that recovery key elsewhere OUTSIDE of the VM for just in case scenarios. Note that depending on how the instance was setup (image, ISO) and if it has the System Reserved (unencrypted boot) partition present but in a bad spot, you may have to address that. I covered a similar scenario
here about moving it.
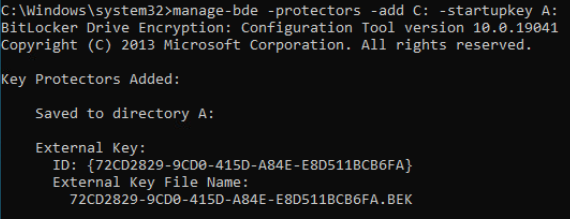
Once Bitlocker has encrypted the OS drive open an elevated cmd prompt and run this to create an external startup key.
manage-bde -protectors -add C: -startupkey A:
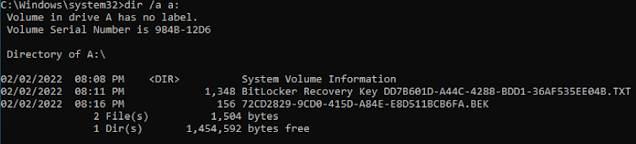
The BEK file shown below is the recovery key just created on the virtual Floppy and the TXT file is the saved backup.
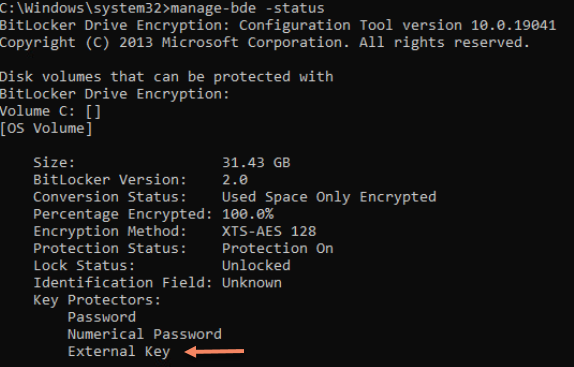
If you do a manage-bde -status you'll see the external key listed.
Do a restart of the VM and it should boot into Windows as if there is a TPM present. The recovery key file is on the floppy if needed in the future as well so you can mount this floppy in another VM or physical PC to get the key out of it if needed. Or remove it if you have it stored elsewhere.
There is a security concern about hosting this in a floppy file. If you have physical access it's game over. I see this as no different than a non-encrypted VM, especially as this is a lab for me. In that case get a newer host that supports TPM2.0 or put the floppy image on a more secure datastore than being co-mingled with the VMX/VMDK files. I use a TrueNAS via NFS for many of my VMs so I could create a dataset with more security to host these such as encryption requiring a manual unlock of the dataset before the VM can use the floppy file.
Alternatively, you can just run this command via elevated shell instead of using the GUI.
manage-bde -on -UsedSpaceOnly -SkipHardwareTest C: -startupkey A: -recoverypassword
Doing it this way will not save the recovery password to a file so copy the output of this into a file or use the GUI to save another copy elsewhere.
-Kevin