Thursday, September 8, 2022

Create Bi-monthly Pay Calendar Events

Someone I know is paid on a Bi-monthly schedule, aka Semi-Monthly, and wanted some help on having reminders in their calendar. A Bi-monthly schedule is generally where a person is paid on the 15th and the last business day of the month. Its more about the bank ETF processing business days than the firms days of operation. The issue is when these fall on a weekend the payday processing is shifted forward to Friday. I used to be on a pay schedule like this myself way back and was slightly annoyed by not being able to have a calendar item automatically address it. July, August, and February (Leap years!)  made end of month recurrances difficult.My friend uses Google Workspace so my focus was on that but this works with Outlook and others.

So how can we automate this? Google Workspace (also Gmail) nor Outlook natively allows you to shift events around based on conditions such as weekends. You pick the 15th of the month or the third Tuesday, that type of repeating. In this case, we not only have weekends but also for thethe  last day of month with it ending on either 30 or 31 and of course, there is February ending on the 28th with the occasional leap year along with maybe a phase of the moon in there somewhere.

Luckily there is a standard for it that can facilitate way more advanced functionality than even what I'm doing here. Its called iCalendar and its covered by RFC5545 and supplemented by RFC7986. When you export calendar events from Google Workspace/Gmail, Outlook, and most anything else it uses this standard via the .ics file format. This replaced the former VCalendar (.vcs) format.

With all of its power, I was unable to get it into one file so there is one for each pay cycle during the month. Therefore one for the 15th and one for the end of the month. I parsed all sorts of developer documents and such around the fields within an iCal file as well as exporting several of my calendar entries to understand the syntax. I know way more than I ever need to know about this. So lets start with what should be the easier one, the first one on the 15th:

 BEGIN:VCALENDAR  
 VERSION:2.0  
 BEGIN:VEVENT  
 RRULE:FREQ=MONTHLY;INTERVAL=1;BYSETPOS=-1;BYMONTHDAY=13,14,15;BYDAY=MO,TU,WE,TH,FR  
 SUMMARY:My Payday  
 DTSTART;VALUE=DATE:20180430  
 SEQUENCE:0  
 DESCRIPTION:  
 END:VEVENT  
 END:VCALENDAR  

The key is the RRULE (Repeat Rule) line. Let's break it down, however, they can pivot off each other so definitions can change based on what attributes are present and there are many other attributes that can be a part of the RRULE. Confusing right? So I have it listed more from a flow perspective since they build on each other which makes more sense to me.

  • FREQ - This is telling it to do a monthly repeat
  • INTERVAL - This says how many times a month, in this case we want once
  • BYDAY - What days will this apply? Business days of Monday to Friday and exclude Saturday and Sunday.
  • BYMONTHDAY - What calendar date can it apply? If Monday to Friday is the 15th then create on the 15th. If the 15th is Saturday then Friday is the 14th so create on that as it matches BYDAY of Friday. If the 15th is Sunday then Friday is the 13th so use that as it matches BYDAY of Friday.  INTERVAL controls how many events can be created.
  • BYSETPOS - This is the nth instance once you calculated the other attributes. BYSETPOS is what tells it to back up to the earlier match of Friday due to BYMONTHDAY also matching vs just skipping this instance that FREQ dictates. Officially this is defined as 'Each BYSETPOS value can include a positive (+n) or negative (-n) integer. If present, this indicates the nth occurrence of the specific occurrence within the set of occurrences specified by the rule.'

The other lines of interest would be the SUMMARY which is the title of the calendar entry and the DTSTART which is when to start the calendar entry. I did this starting on my friend's hire date.

If you want to learn way more about all these fields you can reference this article

I thought the end of the month would be harder but it's actually simpler as we do not need the BYMONTHDAY field. iCalendar defaults to the first day of the month however since the BYSETPOS is negative, that goes back a day which is the last day of the previous month, and then BYDAY dictates the other half of when it can apply.

 BEGIN:VCALENDAR  
 VERSION:2.0  
 BEGIN:VEVENT  
 RRULE:FREQ=MONTHLY;INTERVAL=1;BYSETPOS=-1;BYDAY=MO,TU,WE,TH,FR  
 SUMMARY:My Payday  
 DTSTART;VALUE=DATE:20180430  
 SEQUENCE:0  
 DESCRIPTION:  
 END:VEVENT  
 END:VCALENDAR  

This does not account for any banking holidays nor if the payday policy states if it falls on a Sunday the paydate is moved forward to Monday but it can be modified for this scenario. New years eve is the only one that might come into play.

If you want to make use of this then copy each code block above to a separate text file ending in .ics. Edit as you see fit such as SUMMARY and DTSTART attributes. To import into Google Workspace (or Gmail) you can follow step 2 of this KB. For Outlook you can follow this KB. For other less used calendar programs you can look up the process yourself. For Outlook and Workspace you can only edit the reminders and edit the events except you cannot edit the recurrence part. Note it will use your default reminder settings so you may want to adjust them after you import.

Maybe I will get motivated to see if I can address weekly/bi-weekly pay cycles and holidays such as US Thanksgiving and Christmas.


Wednesday, June 29, 2022

Yes, you can still use USB to boot Homelab Servers

Much software used within homelab as well as SME would get installed on flash media. USB and/or SD cards to be specific. TrueNAS and ESX in particular destroy these types of media, more so in recent versions. VMWare has a KB on it for ESX. It formally stated it was unsupported but they backed down and are stating it will be removed in a future release. William Lam has a good article on it as well. For TrueNAS, IXSystems states its not recommended. Even a Pi-hole on an RPi will wear out a commodity SD Card so people use something like log2ram for it to help with wear.

For my homelab I am going through a hardware refresh. My old servers had a dual SD Card internally that ran the host OS. While I used high-end write-focused SD/USB flash media, I did have one SD card die after several years of use so I do want to be mindful of this in my next refresh. What they are saying is don't use the cheap flash media, NOT the USB interface itself, at least currently.
  
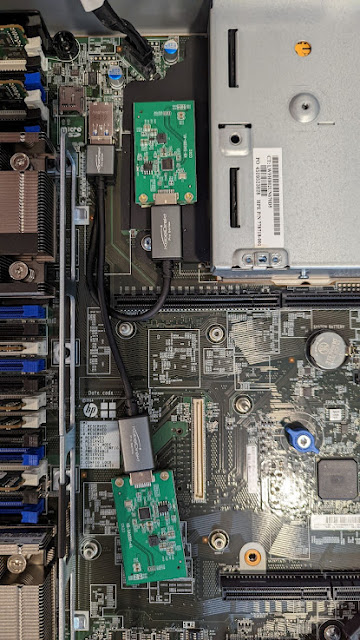
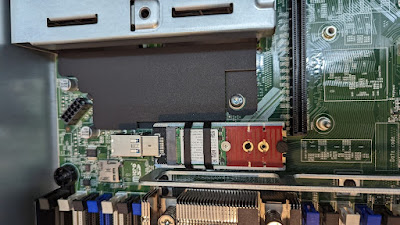
My new servers support USB3 internally however USB2 would be fine IMO. So for ESX I found a 128GB M.2 for $15 and got a USB to M.2 adapter for another $15. Since this card was a 2230 form-factor I also obtained this adapter as I didn't like just using the rubberband the adapter came with.


For TrueNAS since it supports multiple OS drives, I made use of two 128Gb mSATA drives I found and USB to mSATA adapters that were $9 each as well. Due to mSATA width, I used a 6" USB3 cable for each. I just used double-sided foam tape to hold them down.


Been using this configuration for a few months now and works just fine. Startups and shutdowns are nice and quick. TrueNAS shows them as 400MB/s vs 600MB/s for SATAIII. My new servers also have internal SATA headers and power so I could possibly transition to that, at least for ESX as I like the ZFS mirror TrueNAS uses for its system OS. Perhaps a SATADOM would work otherwise just have to figure out the vendor's cable part number for the optical header or build my own.


Wednesday, February 2, 2022

Auto-Unlock Virtual Machine with Bitlocker

Recently I was working on a BSOD issue for a new VPN client version and noticed the Windows instance would not write a memory dump and we thought that BitLocker was interfering in some way as it works fine on non-bitlocker systems but not on BitLocker systems. While that issue was something related to another part of the security suite it did point out I wanted to set up an auto-unlock for the VMs in my lab with BitLocker vs using a PIN at bootup. 

Sure this will work with other hypervisors such as Hyper-V etc however my focus below is on VMWare. I have ESXi 7U2 on a Dell R720 with TrueNAS serving storage via NFS off mirrored vdevs (aka RAID10). ESXi supports passing the TPM however it supports version 2.0 and the R720 has 1.2 so I was out of luck there. I thought I could emulate using a USB stick.

First part is to get a virtual floppy disk attached to the VM that can host the recovery key files. As I have one host I am not using vCenter and just the HTML5 web portal for the ESXi host. Therefore doing this via vCenter will be slightly different. Just edit the VM and under Add other device choose Floppy Drive. In this version, I cannot add a new blank floppy but only attach a previous floppy image. Where am I going to find a clean one of those? WinImage to the rescue!

Run WinImage and select File | New then choose a 1.44MB floppy. you can pick other sizes as the Bitlocker files are really small but this is a pretty standard size.


After creation goto File | Save As and save the file somewhere. Be sure to change the Save as type to Virtual floppy image. I called mine BitlockerBlank.flp. Another reason to use 1.44 is you have a blank floppy image to use for other stuff in the future however 2.88 might be better for that, however even 720kb or 360kb would (barely) work for this use case. Upload this file to a datastore on the ESXi host. I would suggest within the VM folder itself. Or in a more secure location as you can map it from any datastore location.

Back in ESXi edit the VM and under Add other device choose Floppy Drive. Be sure that Connect at power on and/or Connect is checked.


Log into the VM and Open gpedit.msc via Start

Navigate to Computer Configuration | Administrative Templates | Windows Components | Bitlocker Drive Encryption | Operating System Drives

Open Require additional authentication at startup

Select the Enabled radio button

Check Allow Bitlocker without compatible TPM chip. Normally you can close it at this point however in my case I also had to select Do not allow TPM under Configure TPM startup due to part of our security suite overriding it. It would error out like the checkbox was not set when I would try to enable bitlocker via the GUI or command line. Setting this resolved that.

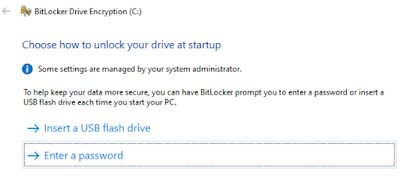
Enable bitlocker via the GUI however you prefer. During setup when it asks how to unlock your drive, choose Enter a password


Then when asked how you want to backup your recovery key, choose Save to a file to save a recovery key file, save it to the Floppy image (A:\) 


Continue the wizard as is, however, I also disable the system check but your mileage may vary. If this is an important VM take a moment and also put that recovery key elsewhere OUTSIDE of the VM for just in case scenarios. Note that depending on how the instance was setup (image, ISO) and if it has the System Reserved (unencrypted boot) partition present but in a bad spot, you may have to address that. I covered a similar scenario here about moving it.

Once Bitlocker has encrypted the OS drive open an elevated cmd prompt and run this to create an external startup key. 
 manage-bde -protectors -add C: -startupkey A:  


The BEK file shown below is the recovery key just created on the virtual Floppy and the TXT file is the saved backup.


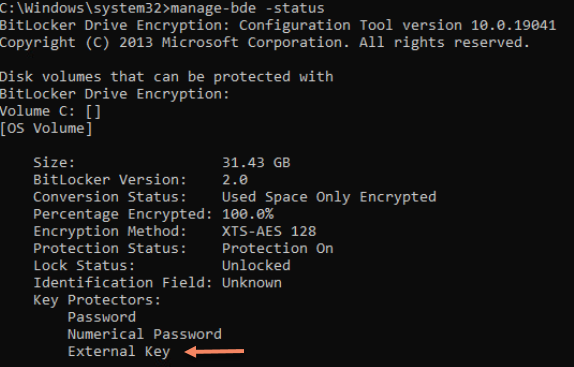
If you do a manage-bde -status you'll see the external key listed.


Do a restart of the VM and it should boot into Windows as if there is a TPM present. The recovery key file is on the floppy if needed in the future as well so you can mount this floppy in another VM or physical PC to get the key out of it if needed. Or remove it if you have it stored elsewhere.

There is a security concern about hosting this in a floppy file. If you have physical access it's game over. I see this as no different than a non-encrypted VM, especially as this is a lab for me.  In that case get a newer host that supports TPM2.0 or put the floppy image on a more secure datastore than being co-mingled with the VMX/VMDK files. I use a TrueNAS via NFS for many of my VMs so I could create a dataset with more security to host these such as encryption requiring a manual unlock of the dataset before the VM can use the floppy file.

Alternatively, you can just run this command via elevated shell instead of using the GUI.
 manage-bde -on -UsedSpaceOnly -SkipHardwareTest C: -startupkey A: -recoverypassword  

Doing it this way will not save the recovery password to a file so copy the output of this into a file or use the GUI to save another copy elsewhere.

-Kevin


Monday, January 31, 2022

Inexpensive GPS Local time for OPNSense

I came across this YouTube video from Austin about using an inexpensive GPS device ($12 US) to get local GPS time services via a Raspberry Pi. I wanted to see if I can set it up for OPNSense. I'm sure that PFSense would be very similar.  I had set up a robust NTP based time service for an employer in the past so time and using GPS for it fascinates me. This was extremely simple to setup actually.

For a good overview of NTP, this YouTube video by Gary explains well without going too deep.

I have wanted to have one at home but never justified the cost as NTP is so easy to come by over the internet especially with the public pool available. Having one is more about bragging and experimenting than anything really. Having a local one would be useful during long Internet outages and for local resources such as cameras though. I thought of looking for an old Garmin GPS yet this device Austin mentions makes it really reasonable. Note in my application, I did also get a more sensitive antenna ($10 US) as the included one doesn't work in my finished basement unless I had it next to a window. As I designed a homerun for server and AV equipment I didn't expect to run anything to a window. I obtained these via Amazon but there are other options out there.

For the GPS module, this is used for drones and other maker stuff so is real tiny at about an inch squared. It is a clone of the U-Blox NEO-6M. Additionally, I found a case for it on Thingiverse that I had a friend print up for me to make mounting it easy. The antenna just converts from IPEX to SMA connector and ~30db gain antenna.

I connected it up via USB to my Dell R220 running OPNsense. If you want to do this right, you really should use serial as USB is a "shared" resource vs "dedicated" that serial is. Other devices on the USB hub can skew the GPS time source. You see this in the higher jitter readings from this time source. For now, USB is fine for me as I am also using several network time sources concurrently. With NTP you should use 4-7 sources and it allows ntpd to become more precise than just using 1. 

Configuring OPNSense was pretty easy as it has preset for U-Blox (and other devices such as Garmin.) I did change to 9600bps from 4800bps.


For the port, BSD uses 'cuau*' for serial and 'cuaU*' for USB.


then uncheck the two PPS checkboxes as this device does not provide PPS (Pulse Per Second) over USB, only  adedicated pin via serial. This device only outputs NMEA stanzas via USB.


You can see this in the logs.

2022-01-23T19:01:34ntpd[59143]kernel reports TIME_ERROR: 0x2007: PPS Frequency Sync wanted but no PPS; PPS Time Sync wanted but no PPS signal 
2022-01-23T19:01:34ntpd[59143]0.0.0.0 042d 0d kern no PPS signal 
2022-01-23T19:01:34ntpd[59143]0.0.0.0 041d 0d kern PPS enabled status: 2041 -> 0007

By default, U-blox has a Fudge Time 2 of 0.400 seconds. For this clone that was not valid. Trying a few values I landed on 0.06 for it. You can find the fudge 2 value via logs. Turn on Peer Stats, which is located on the Network Time | General page under Statistics logging


and set Fudge time 2 to nothing and let it run for several hours or so. I let it go overnight. SSH to the OPNSense and run 

 awk '/127.127.20.0/ { sum += $5 * 1000; cnt++; } END { print sum / cnt; }' < /var/log/ntp/peerstats  

for me it output -58.6234. Just note that the output is in milliseconds and the Fudge time 2 box is asking for seconds. So output of 58.6234 gets entered into Fudge time 2 as 0.058. After that, no more False Ticker is listed under NTP Status. I was real close with 0.06 and this gets it more in alignment with the network sources and addresses the USB bus issues better. Be sure to turn peer stats logging off once you are done so you dont fill your OPNSense storage and delete the files.

I was curious why it was showing the IP of 127.127.20.0 for the GPS source. In looking it up, the pseudo IP address (127.127.x.0) changes where x is the "driver" type and needs to match your use case.

Drivers:

NTPd prefers to have 4-7 time sources. It uses this to get a consensus between them all to throw out any bad sources (tickers) but additionally uses them all together to become more precise. I use these network sources

  • Employer GPS
  • time.cloudflare.com
  • time.facebook.com
  • 0.us.pool.ntp.org

I do not use Google time as they smear leap seconds wheras everyone else will have 61 seconds on the leap. The last one was in 2017 with none currently scheduled. You should use sources that handle a leap in the same way.

Once configured you should be all set and can view this on the dashboard


Or under Network Time | Status. It's currently favoring the local GPS module with the others being within 3ms (milliseconds) either direction.


Note in both cases OPNSense provides a click to Google Maps to show where the GPS is located. Nice feature.

As a bonus, I always create an A or CNAME for time.mydomain.TLD that points to the firewall and also add it as a DHCP option for those few devices that use that field. I then just change the DNS record to the new internal time source if needed. I set all my systems to use it so my environment is at the same time.

In the future, I may switch over to serial and see if this device will let it be powered by USB but use serial for comms. though running a5v to the serial header won't be that difficult by chopping a USB cable up. PPS generally is provided via the DCD (Carrier Detect) pin.

-Kevin