Saturday, December 20, 2014

Quicker parsing of Apply Driver steps

Was talking to someone at the local user group and he (Thanks for the Jamba Juice John!) was curious how I was handling driver detection in the TS so quickly so I thought it would be something to share with everyone else as well.

With that said, I have a question for you. How many hardware models does your TS support? When we had XP, its TS supported nearly 80 different models. With W7 its 43 as of today. That will just grow during its life. W8.1 is pretty recent and its already about a dozen.

With that many models I found it was adding unnecessary time to a TS processing due to the constant WMI query on each Apply Driver Package step so I changed how I did it years ago.

The most common method people use is to do a

  SELECT * FROM Win32_ComputerSystem WHERE Model LIKE “%Precision T3600%”   

On each Apply Driver Package step. Works great for sure but it takes longer then pulling a TS variable, especially inside the PE instance that's not as optimized as the full Windows instance. I'd rather cache the data then do the query over and over.

What I did is basically do a single WMI query within our tech interview HTA and pass that to the TS as the variable ‘OSDComputerModel’. Then during a driver step we just do a condition based on the variable. We can use this variable for other tasks in the TS and TS Variable exports during failures capture the model also via this variable.


For something like the Dell Venue 11 you can add multiple models as a variable, as one driver package could support multiple devices.


The only system that I have found does not work well is the Panasonic FZ-G1 tablet. Their computer name is all over the place so its easier to do the query on the step with % wildcard as it starts with 'FZ-G1' and a bunch of letters (FZ-G1AAHAFLM for example) then the recently released Mark II changed it to 'FZ-G1-2' and a bunch of letters.

Overall, this query is the same output as doing ‘wmic csproduct get name’ via a shell which is an easy way to figure out what it will be populated with, even in PE. 


 C:\Users\Kevin>WMIC csproduct get name  
 Name  
 Precision T3600  

We also normalize it by removing spaces and what not so its more friendly to work with then doing a WMI query during a driver step and dealing with LIKE and other operators.

To further streamline the deployment process, we also look at the chassis and spit that out via ‘OSDChassis’ variable. If it’s certain chassis types (8-14), it’s a laptop, if not it’s a desktop. This allowed us to group them together in the TS. This means that if you’re on a laptop, it skips ALL the Desktop steps since the parent Desktops group has a condition for desktops which does not match. As we move more to Windows 8.1 and 10 we will expand the chassis to support tablets however, many laptops and tablets have the same chassis type so it will be a while.


Here is the rough layout of the Apply Drivers Group.


The Apply Hardware vs Virtual Drivers Group is similar. No need to walk the hardware steps if it’s a VM. So the VM folder will apply drivers based on the conditions matching,(ANY)  whereas the hardware drivers folder will apply if they are NOT virtual (NONE), shown below. Currently this calls out the main Hyper Visors in use, but we will eventually switch to using a script from MDT that detects virtual and sets a variable.


Download

This script is provided as-is, no warranty is provided or implied.The author is NOT responsible for any damages or data loss that may occur through the use of this script.  Always test, test, test before rolling anything into a production environment.

The HTA is pretty customized, hence why I have not released it. With that said, I did attach one we used for XP that just grabbed the above data and moves on so that should get you going.

Might have to comment/remove lines 20-21 & 52 as that pulls the asset tag and serial from BIOS and not all manufactures use that part of WMI for that. As you see above we are mostly Dell so its centered around that manufacture.

You can get it from here.


Monday, December 8, 2014

Managing SCCM Console installs


As I move to implement CU3 in our 2012 R2 environment, one of the tasks done is to update all your consoles. With my firms size we have consoles all over the place. They are on Site Servers, Workstations, Abacus', even hosted on Citrix. I wanted an easy way to deal with them, so why not treat it like any other software you manage via ConfigMgr?


While we are on CU1 currently, I learned that there are actually several console installs that are still on R2 and should be on CU1, even a non R2 out there. When we move to CU3 those will get cleaned up.

First things first, setup the Collections. We set them up not only for 2012, but also for each CU revision as shown above. This was to manage and keep track as we migrate from CU1 to CU3 and beyond. As with any other software Collection, we looked at Add/Remove for the Console Software which was called 'System Center 2012 R2 Configuration Manager Console'. We then split it out for versions. Luckily we turned to this TechNET blog post that had the version info to query on. This link is also useful for other tasks like ConfigMgr agent version.

To save time, you can cheat and just copy the query language below:

 select SMS_R_SYSTEM.ResourceID,SMS_R_SYSTEM.ResourceType,SMS_R_SYSTEM.Name,SMS_R_SYSTEM.SMSUniqueIdentifier,SMS_R_SYSTEM.ResourceDomainORWorkgroup,SMS_R_SYSTEM.Client from SMS_R_System inner join SMS_G_System_SoftwareFile on SMS_G_System_SoftwareFile.ResourceID = SMS_R_System.ResourceId inner join SMS_G_System_ADD_REMOVE_PROGRAMS on SMS_G_System_ADD_REMOVE_PROGRAMS.ResourceId = SMS_R_System.ResourceId where SMS_G_System_SoftwareFile.FileVersion = "5.0.7958.1401" and SMS_G_System_ADD_REMOVE_PROGRAMS.DisplayName = "System Center 2012 R2 Configuration Manager Console"  

Just change the version '5.0.7958.1401' to the one you care about, or remove it.

For the pre R2 systems we had to use a different Add/remove name of 'Microsoft System Center 2012 Configuration Manager Console'. BTW, you can use this query if you don't want versions. Here is that query:

 select SMS_R_SYSTEM.ResourceID,SMS_R_SYSTEM.ResourceType,SMS_R_SYSTEM.Name,SMS_R_SYSTEM.SMSUniqueIdentifier,SMS_R_SYSTEM.ResourceDomainORWorkgroup,SMS_R_SYSTEM.Client from SMS_R_System inner join SMS_G_System_ADD_REMOVE_PROGRAMS on SMS_G_System_ADD_REMOVE_PROGRAMS.ResourceID = SMS_R_System.ResourceId where SMS_G_System_ADD_REMOVE_PROGRAMS.DisplayName = "Microsoft System Center 2012 Configuration Manager Console"  

Update:
Looks like I wasn't the only one with this idea.


-Kevin


Sunday, November 9, 2014

Auto Populate Patch Testing Group

Issue

This month is a big month for Microsoft patches. With that said, have you ever had a patch blow up in your face or cause your pet to implode? No, never, they always work you say. For me unfortunatly I need new pets regularly... So I have a Patch Testing Group (PTG) that does that, test patches. In other words they get the patches before the rest of the fleet. Managing membership in PTG is cumbersome. Someone leaves the company, they are out, so we have to replace them. Computer is acting up and gets refreshed, they are out, so we replace or readd them. You get the idea. In an organization of many tens of thousands of systems it takes time to manage membership. If not managed, the PTG can go down to zero.

Background

MS releases patches on the second Tuesday of the month generally (excluding zero day) as we all hopefully know. Most organizations wait a week or more before applying to the fleet so they can test and mine is not all that different. To address it via a PTG, we created two AD Groups. One for the user of the machine and one for the machine itself. The user AD group is used for communications and the machine group is for the ConfigMgr collection and subsequent advertisements.

I always believe a PTG should NOT include IT staff and instead have a good representation of the user base. IT cares about what we care about and the users care about what they care about. IT isn't able to test some random accounting app that unknowingly takes advantage of a bug in the OS, which MS happened to patch this month. Multiply that by the thousands of apps floating around my organization and IT is unable to test every iteration based on the phase of the moon.  So we turn to the experts of all that other software, the users themselves. Thats PTG.

Resolution

Managing PTG has always been a pain. For our size, our InfoSec team and I feel a thousand systems is a good representation of our fleet. I had Cory Becht, (who WAS our ConfigMgr admin, he was stolen by MS, grumble grumble... :) Now hiring! ) write another wonderful script based on my quirky ideas before he left.

What it does is looks in ConfigMgr for workstation machines that were deployed in the last 30 days, and if the primary user is identified (you are using UDA right?), it will randomly decide to put that person and machine into PTG. I refer to this process as winning the lottery. It then sends an email to the user telling them they won and what that means and make getting out slightly annoying process. It also sends a summary email to the IT contact of who was added.

There are additional controls in place as well. For example, each run can be limited to how many are added as well as the max to allow (1000 in this case). This way the helpdesk is not overloaded with removal requests or questions over what they just won. We can comfortably bring PTG up to where we want it. I have the script running on a weekly basis.

There are a few things its lacking that will go into a new version:
  • Ability to blacklist people, VIPs for example, who should not be in here. 
  • Not re-add anyone who requested out
  • If a machine is removed from AD for whatever reason, the person should be removed. 
  • Support HTML for the user email for logo etc so its prettier.

Configuration

I wont cover setting up a PTG here, only the ongoing management of membership in it. As mentioned earlier, we have two AD groups for PTG use so the script revolves around that.
  • Patch Testing Group Users
  • Patch Testing Group Computers
One holds users and the other machines. The users is a DL that gets notification emails and the Computers group is tied to a Collection in ConfigMgr to get the patches early.

There is an EmailToUser.txt text file that is sent to the user when they "win". Customize as your environment needs. The script itself has several variables at the top needing to be customized to your environment. Should be mostly self explanatory but still allows some granular control. Items worth expanding:
  • blnTestRun - Test mode to make sure its running correctly before you let it loose. 
  • blnEmailUser - Allows you to tell the users they won or not.
  • blnEmailTestUser - Lets you BCC the helpdesk to the user emails or not. 
  • strEmailsFromTech and strEmailsFromUser - Lets you use an established "from IT" mailbox but the techs see its coming from the script.
 blnTestRun = True 'If True, the computer account and user accounts will not be added to the group. Emails will not be sent to the user either.  
 blnEmailUser = False 'do you want to email the end user that their computer has been added to the patch testing group? Test Run variable has to be set to False otherwise this is skipped.  
 blnEmailTestUser = False 'If set to True then the test email account will receive the indivdual emails as well  
 strPTGNameUser = "PTGTestGroupUsers" 'Name of group to contain user accounts  
 strPTGNameComputer = "PTGTestGroupComputers" 'Name of group to contain user accounts  
 intQuantity = 1000 'maximum number of computer accounts in the group  
 intMaxAddLimit = 50 'maximum number of computer accounts to add each time the script is run  
 intMinBuildDays = 30 'number of days past build date to look at for adding to the group. Make sure that User Device Affinity has had enough time to generate this  
 strEmailFile = ScriptPath()&"\EmailToUser.txt" 'path to the standard email template  
 strSMTPServer = "smarthost.mycompany.com" 'SMTP server to use  
 strEmailsTech = "[email protected]" ' separate with semi-colon and space.  Ex: "[email protected]; [email protected]"  
 strEmailFromTech = "[email protected]" 'From address that goes to email addresses that receive test and summary messages  
 strEmailFromUser = "[email protected]" 'From address that users will see  
 strEmailTest = "[email protected]" 'Test email account that will receive the individual emails  
 strEmailSubjectUser = "Your computer has been added to the patch testing group" 'Subject in email that goes out to users  
 strSQLServer = "SCCMDBserver.mycompany.com" 'FQDN of SQL server hosting ConfigMgr database  
 strDB = "CM_DB" 'DB name of ConfigMgr  

When you first run it, create two test groups in AD and configure the script and test. It will send summary with what it wanted to do. Then set blnTestRun to False but leave the blnEmailUser false, maybe set blnEmailTestUser to true. It will add users and computers to the test group but notify the techs only. Once its all validated to be working in your environment, change to your prod groups and enable blnEmailUser if you want. Then setup Collections and adverts and you have automatic PTG population.

Update 11.13.2014

Found a couple minor spelling errors that impacted the user email so corrected version below.

Download

This script is provided as-is, no warranty is provided or implied.The author is NOT responsible for any damages or data loss that may occur through the use of this script.  Always test, test, test before rolling anything into a production environment.

You can find the script referenced in this post as well as a sample enduser email here. You will need to tweak them for your environment as shown above.

-Kevin

Tuesday, October 7, 2014

Capture Logs from Task Sequence... and then some

As we all know, ConfigMgr OSD deployment process can sometimes be finicky.  Start imaging two identical computers and one might fail while the other is successful.  There could be a number of reasons:

  • DP replication issues
  • Planets are not in alignment
  • Network issues
  • Someone cut the hard line.  
  • ???

Whatever the cause, If the error is at the beginning of the task sequence there is no major downtime but if the error is towards the end, then that 2-3 hour image deployment process could take 4-6 as they start it over again and for what, Adobe Reader didn't install because someone or something updated the DP content?

Issue

We typically do not use the “Continue on error” flag in our TS’ because if a particular step fails, it’s difficult for us to know about that failure until the image is complete, or possibly deployed and someone goes looking for that software. For example, if Adobe Reader fails, the entire TS errors out, the tech gets frustrated as they have to start all over again.  They notify the support structure, we fight to get logs so we can figure out what happened, end up in most cases having them try again and this time all is right and life moves on.  I've always been of the mindset that if it failed, we should start it over as its not in a "clean" state when deployed. Going down this road below is a bit of a compromise with my techs. So how can we consistently deploy a computer at the end of the imaging process that is as complete as possible and if not, notifies the technician there are installs still needed.

Resolution

The fix for this is quite simple if not laborious depending on how far you take it.  Others have captured logs via the TS, however, it opens up a world of possibilities for reporting and data gathering (logs! logs! logs!) as well as consistently producing a computer that is usable by the tech even if there was a small error or two.  In VB programming terms it is called a 'try…catch block'.  You “try” a particular command and if there is an error, the “Catch” step in this block captures and acts on the error so the code can continue on. 

To use task sequence terms, it is simply creating a parent group folder for a step that has the 'continue on error' flag checked so that when the TS checks with the parent folder after an error it continues on.  The 'catch' is a new parent group folder as the very next step which has a specific condition attached to it to catch the error and perform an action.

When a TS step errors it sets an internal TS variable, '_SMSTSLastActionSucceeded' to false.  The 'catch' group has a condition set so if '_SMSTSLastActionSucceeded' = false it will run.  In that group we have a step named 'Create Log' that uses a script to capture all the logs from the current log path using the internal '_SMSTSLogPath' variable and copies them to %OSDISK%:\OSDLogs (This variable is set via the 'Partition Disk' steps like MDT), so if logs are needed from techs we don’t have to fight to find them since they move around and each error gets its own timestamp named folder so if there are multiple errors each error will generate its folder structure with the logs relevant to that error.  The last action succeeded variable resets to “True” and the TS continues on yet the tech still needs to be notified. 


Before a particular step runs I set a variable to something relevant to that step.  If applying the base WIM it is set to “ApplyWIM”.  Installing Adobe Reader is “AdobeReader”.  Installing Windows Updates is “Updates”.  You get the picture.  Note these are shown during the dialog at the end


Use whatever makes sense to you and place that step in any location you might need to know about if a failure occurs. If a failure does occur, the script used by the “Create Log” step reads that variable and writes the step to a text file in the %OSDISK%\OSDLogs folder.

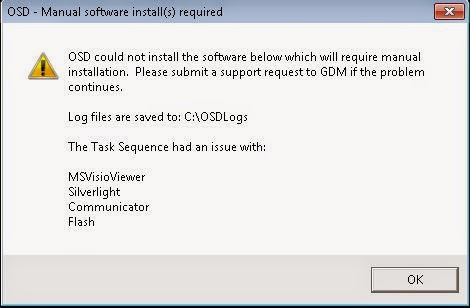
At the very end of the TS a VB script message box is displayed that lists some basic instructions as well as the item(s) that failed (below).  The tech can then install what was missed post Task Sequence.


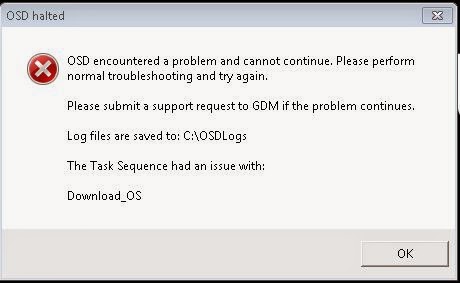
Now there is a big difference between Adobe Reader not installing and the OS WIM not being downloaded. Adobe Reader can be installed by the tech obviously, or even have the TS put this system in Collection to deal with it, however if the there is an issue downloading the WIM, there is not much the tech can do at that point.  To address this, I have two final message boxes I use for “Major” and “Minor” failures.  Major failures are anything that can stop the image process or better yet any step that if there was an error at we would not want or can’t deploy the machine.  Minor failures are items that a tech should easily be able to resolve.  My “Major” message is below.


For the minor errors I want the TS to continue on to the next step but for the major errors I want it to stop.  For that reason in my TS I have no catch group anywhere up until when my software starts to install.  But I am still setting step variables so if there is a major failure, I will know where.  The entire TS is enclosed in a try…catch block so if there is an error it always falls back to the top level folder and continues on to the catch group.  I have steps to notify the techs depending on the failure.  Condition are set so if the failure equals one of the major steps it runs the “Notify Tech – Major failure” in the example above.  Anything else it will run the minor. 


The TS here is an over simplified sample TS to show the basic structure.
When I first started experimenting, I placed the entire TS in a try…catch block and once I saw it worked, started grouping software into try blocks as I wasn't sure if I would hit a limit on the number of steps allowed in a TS.  I had all MS software in one block, Adobe software in another but the problem with that was if a particular step failed, it would stop processing everything else in that group.  The catch afterward would catch the error and proceed to the next group but any step after the failure in the “Install Microsoft Software group” would not get run.


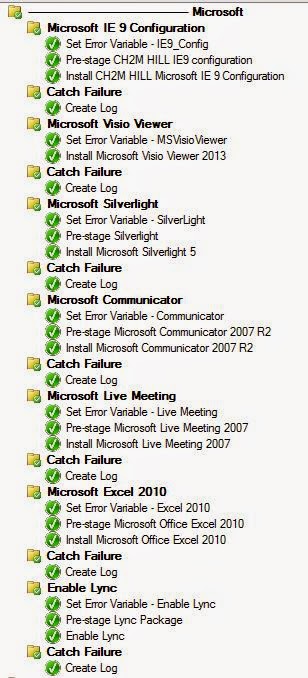
This is a sample of the MS section. You can ignore the 'pre-stage' steps as those are for 1E Nomad (posts coming soon!). So I set out on a journey to see if I could have a try…catch block at every software install step that was important enough to catch.  I wound up with a lengthy TS but so far it is consistently doing what it was built for, producing an imaged computer at the end that captures any errors and notifies the tech afterwards if there is a failure.

The imaging time is not increased due to a relatively minor failure to install a package freeing up techs to do other things.  If the image is successful, the techs will notice nothing other than what they are used to, a Ctrl+Alt+DEL login screen when complete.


After that endeavor, I started thinking of other possibilities.  The TS now compresses the %OSDISK%\OSDLogs folder and copies it to a network share.  In the case of a failure, an email is sent to our support group Inbox advising of the failure so we can jump on the issue proactively. Depending on the step that failed I am gathering additional logs that can help determine cause such as copying the WindowsUpdate.log if there is a problem with installing any updates or the logs from the %WINDIR%\Panther folder if there is a problem applying the OS. In the screenshots below, there were several items that failed and going into Reader you can see it grabbed all the relevant logs up to that point.


Since we are gathering data on failures visa-vie the error logs, why not gather data on the successful images as well? To that end I am now gathering start and end times when an image is successful so if we ever do want to see how long an image is taking we have the data outside of reports. This can also be useful in tuning OSD or noticing that it takes 20% longer in office X vs Y.

And that is really what this is all about, gathering the data you need at the time so you can have a baseline to improve processes, to fix an issue expeditiously, even proactively before it blows up.

To go one step further you can reference this post for simple cleanup of the log folders.

Download

This script is provided as-is, no warranty is provided or implied.The author is NOT responsible for any damages or data loss that may occur through the use of this script.  Always test, test, test before rolling anything into a production environment.

You can find all the scripts referenced in this post as well as a sample TS (2012R2)  here. You will need to tweak them for your environment for things like variables and log paths. The scripts should get updated to be more friendly towards distribution.

-Kevin


Monday, September 15, 2014

Enumerate AD Group User Object Membership

Lots of scripts out there to do this type of work but I could not find exactly what we needed so wrote one.  I started playing with .NET so the compiled EXE and the source for Visual Studio are attached.

Issue

I have a group in AD that has all IT in it. There is a collection that points to it for deployments and its used as a DL for communications. I wanted to export all user objects that are in it. This group has other groups as members who in turn have other groups as members. Lots of nesting here.

Resolution

This script will export all user objects to a CSV and enumerate the SamAccount, Primary Email, and UPN attributes. It will keep digging into any nested member groups to obtain all the user objects. The output file will be created as group you give it with stripped spaces. For syntax, there really isn't any. Just run it and it prompts.

 C:\Users\me\TempStuff>GetADGroupMembership.exe  
 Please enter the AD group you want to get membership for:  
 My Companies IT Master Group  
 File will be generated where this program is run.  


Download

This script is provided as-is, no warranty is provided or implied.The author is NOT responsible for any damages or data loss that may occur through the use of this script.  Always test, test, test before rolling anything into a production environment.

Get it here.

-Kevin

Wednesday, August 13, 2014

MDT sourced WIM and SUP

Overview

As previously mentioned, like many, I generate a prepatched WIM via a Build and Capture TS in ConfigMgr on a quarterly basis. I have to fight the Install Software Updates step(s) from time to time so I recently moved to using MDT to do the B&C and importing into SCCM. Johan Arwidmark and others are suggesting this path now. While doing some WSUS cleanup I noticed there were several hundred systems in it console. It should have a couple at most. from the B&C TS ran against it.

Issue

The MDT server has the usual suspects to support MDT like WSUS, ADK, etc, so its built to handle a VERY small usage base. The issue is a simple one. MDT will setup the HKLM\Software\Policies\Microsoft\Windows\WindowsUpdate\ WUServer and WUStattusServer strings to reflect the WSUS server its using during the B&C. The WindowsUpdate key is retained during deployment. What happens is during deployment, the Windows Update Service starts talking to the WSUS server configured by these strings. Later in the Task Sequence SCCM will update it for the Install Software Updates step(s) so it fixes itself. Being the purist I want to correct it earlier.

Resolution

This is corrected very easily by deleting the WindowsUpdate key so it reverts back to factory.

 REG.EXE DELETE "HKLM\Software\Policies\Microsoft\Windows\WindowsUpdate" /f  

Additionally I stop the Windows Update service (wuauserv) as it reads these settings at service startup. It will get new settings after the next restart as I have several during the deployment TS. You could start it back up or even set all the settings for SUP.

 NET STOP wuauserv  

There are two places to resolve this. Permanently via the MDT B&C TS, Put the delete command step AFTER your done using the WSUS server via the two 'Windows Update' steps. There isn't really a need to stop the service. For an already deployed WIM in ConfigMgr, just put them both after the 'Setup Windows and Configuration Manager' step as the deployment will have switched from the PE instance to the deploying instance. Once a new B&C is imported, you can remove the steps from the deployment TS.

-Kevin


Monday, July 21, 2014

Password Protect Task Sequence

Overview

As my firms EUC (End User Computing aka Workplace) Architect, I am working on our tablet strategy and that requires Windows 8.1 Task Sequences. I noticed in reports that there were far more Windows 8.1 systems then I am creating in my work for this project. I was finding that techs are trying it out, and causing other issues, so I had to come up with a quick solution to keep the riff raff out so to speak. So in short, I have now mandated that any non production Task Sequences are password protected. This just keeps the honest people honest really.

In your Task Sequence, set a Variable for OSDPassword and put in a password. I create a group at the top of each Task Sequence to hold stuff like this called 'Set Up Shop'. This way, each TS can have its own password in place. Also super easy to change.


Then later in the TS, you call the PromptForPassword vbs via its package. I put it between the 'Partition Disk' step(s) and the 'Apply OS' steps, but before the HTA (Tech Interview). Why not as the first step in the TS? Since ConfigMgr 2012 is download and run, it will still run on a bare hardware environment where there have been no volumes created.


During the deployment you will see a dialog box asking for the password. Real simple, no  X attempts before it fails out, obfuscating the password from shoulder surfers, or any other checks and balances. Like a car alarm, Its meant to keep the honest people honest.


Download

If you add any checks and balances I would love for you to send it upstream to me.

This script is provided as-is, no warranty is provided or implied.The author is NOT responsible for any damages or data loss that may occur through the use of this script.  Always test, test, test before rolling anything into a production environment.

You can get the script here.

Tuesday, June 24, 2014

Determine OS arch to apply automatically

Overview

In my Windows 7 Task Sequence the tech can choose whether to apply a 64-Bit or 32-Bit OS WIM via a radio button in the HTA.


This allows a single Task Sequence to be used for the deployment of Windows 7 vs picking a different TS for each arch. 64-Bit is the default and our standard, with 32-Bit being the exception based on needs. There are a few older applications that require 32-Bit windows for things like 16-Bit installers. Based on what the tech selects, the HTA creates a variable called 'OSDBitLevel' and sets it to 'X64' or 'X86' and there are two apply WIM steps that will run based on the condition.


Now that I am beginning to work on a Windows 8.1 TS as part of my Tablet strategy I really wanted to leave 32-Bit behind, however Dell and others are using Atom procs or chipsets that do not have the x86-64 (aka AMD64) instruction set.  Therefore, I've set the mandate that these older applications will require Windows 7 if  used and that with Windows 8 forward the arch will be applied automatically based on the hardware. Its been removed from the Software XML the HTA references as an option and the HTA will now check what type of processor is present and if it supports 64-Bit it will apply that arch and if its a low end tablet for example, it will apply the 32-Bit image.

Since its done via my HTA, I have a simple vbs attached to do the same thing should you find it useful. Like my HTA, it sets a variable called 'OSDProcArch' and sets to '64' or '32'. Took me a little bit to settle on the best method but looking at CPU info in WMI became the most effective way. I like doing variables so I can use stuff elsewhere simply, but you can also do this via a WMI Query condition on each apply WIM step if you prefer.

 SELECT * FROM Win32_Processor WHERE DataWidth ='64'  

You can manually check it via command prompt by doing a 'wmic cpu get datawidth'. Don't confuse this with 'AddressWidth' which returns what the arch of the CURRENTLY running OS is, not what the CPU is capable of. 'wmic cpu' itself returns a wealth of useful information.

Download

This script is provided as-is, no warranty is provided or implied.The author is NOT responsible for any damages or data loss that may occur through the use of this script.  Always test, test, test before rolling anything into a production environment.

You can get the script here.

Monday, May 12, 2014

Deprecate Old Systems From Active Directory

Update

There is an updated version that pulls UDA user info out of ConfigMgr here.

---
So with a show of hands, who knows the best way to keep ConfigMgr clean and happy? By keeping Active Directory clean and happy of course. That is super easy right? Sure it is. Not. This post focuses on keeping machine objects from taking over.

Overview

My firm has several hundred IT staff and many tens of thousands of machine objects. For various reason's they don't always remove a machine object from AD so it in turn gets removed from SCCM. Additionally we have lots of machines that are off the domain for months at a time and get stolen or lost without IT being notified in a timely fashion. Either way, machine objects are cluttering up OUs in AD, and over in Configuration Manager they are cluttering up Collections and Reports.
Once again Cory to the rescue coding to my quirky ideas. I refer to it as 'Purgatory', however some others didn't like that so we went with the creative name of ADCleanup. It is ran daily and what it does is look at the last time a machine made contact with the Domain via the lastLogonTimeStamp attribute being updated.

In the root of the user/machine Domain we have an 'ADCleanup' OU with a couple sub OUs called 'Active' and 'Disabled'. Additionally we have a separate structure for Servers. By segregating these older systems we can exclude these OUs from ConfigMgr reports for more accurate reports yet the best part is the removal of these objects.

Process

After 90 days of no contact the machine object is moved into the 'Active' OU and the description attribute is appended to reflect it was moved.

 ::Account Automatically Moved - [5/1/2014 11:37:13 PM]  

Then after an additional 30 days, the object is disabled and moved to the Disabled OU. Again the description is updated. Disabling was requested by our InfoSec team.

 ::Account Automatically Disabled - [4/11/2014 11:35:50 PM]  

Then when another 30 days has passed the object is deleted from AD.

Fun part is if the object is updated (lastLoginTimestamp) while in the Active OU, the script will move it back to where it was found. If the object is manually enabled while in the Disabled OU, it will try to move it back to where it was found.

Additionally it also generates an email that goes to our Process Management team who keeps an eye on it and deals with any manual tasks generated from it.

 Disabled computer account ABC12345. Account was moved on 3/25/2014 11:35:20 PM.  
      ABC12345 was moved to ou=Disabled,ou=ADCleanup,DC=mydomain,DC=local.  
      Updated the description for account ABC12345.  
 Moved ABC09876 with last logon of 1/24/2014 6:12:25 PM from CN=ABC09876,OU=Computers,OU=MYOFFICE,OU=,DC=mydomain,DC=local to ou=Active,ou=ADCleanup,DC=mydomain,DC=local.  
 Enabled computer account ABC5678 was moved back to OU location of OU=Computers,OU=MYOFFICE,OU=,DC=mydomain,DC=local.  
 Unable to move computer account BAD1234 from CN=BAD1234,OU=Computers,OU=MYOFFICE,OU=,DC=mydomain,DC=local to ou=Active,ou=ADCleanup,DC=mydomain,DC=local Error:-2147024891.  

Download

Sound useful?  The time frames and paths can be modified so review lines 1 through 27 and 654. Line 19 lets you choose specific OS versions to work with to include Servers for example. We use an older version of this script for Servers specifically. There are two optional support files available. One for Excluded Computers and one for Excluded OU's. They are used to exclude objects manually created for non Windows devices such as SAN or Linux systems as well as special purpose OUs that need excluded.

This script is provided as-is, no warranty is provided or implied.The author is NOT responsible for any damages or data loss that may occur through the use of this script.  Always test, test, test before rolling anything into a production environment.

You can get the script here.

Tuesday, February 25, 2014

Update CMTrace for limits

Overview

Ran into this issue again recently at an MDT install. Took a few minutes to realize they had an older version of CMTrace on their Deployment Share and PE media. Was trying to track down several OSD deployment issues and befuddled why nothing was in the log after a certain point. Took a bit to figure out the log viewer was the initial fault. Long story short, CMTrace.EXE from ConfigMgr 2012 RTM is limited to seeing 8000 lines in a log. Microsoft has a KB about it here. I originally ran into this issue a while back with ConfigMgr 2012 RTM and even SP1 with PE media that had the RTM version in it.

Solution

Simple, get an updated version from various sources. If you have ConfigMgr 2012 R2 (or SP1) installed you can get the 32-Bit and 64-Bit editions of CMTrace from the ConfigMgr_Root_Folder\OSD\bin\i386 and x64 folders.Even if you are using ConfigMgr RTM or SP1 you can grab the CMTrace in the R2 Toolkit (or the SP1 toolkit) and update your copies.

For PE media, don't forget to get the 32-Bit or 64-Bit one for your architecture since PE does not have SysWow64 in it. I generally recommend to inject it into the PE media. In MDT do it via the Extra folder under the Deployment Share Properties I also put it in the root of the Deployment Share by putting both 32-Bit and 64-Bit versions there for use in once you have switched from PE to the deployed OS. For ConfigMgr OSD you can do via osdinjection.xml.

Johan Arwidmark has a HOWTO to split the two arches from the toolkit.

CMTrace 2012 Versions

  • R2 SP1 - 5.00.8239.1000 
  •     R2 - 5.00.7958.1000
  •    SP1 - 5.00.7804.1000
  •    RTM - 5.00.7711.0

CMTrace Current Branch Versions

  • 1511 - 5.0.8325.1000
  • 1602 - 5.0.8355.1000
  • 1606 - 5.0.8412.1000
  • 1610 - 5.0.8458.1000
  • 1702 - 5.0.8498.1000


Wednesday, February 19, 2014

Where'd that XP come from?

Overview

How far along are you in your deprecation of XP? We refreshed nearly 5000 XP systems (even some x64 Edition) during 2013 and have a couple dozen or so still in use along with ~ six Vista systems. Most are tied to lab equipment with no network needs. With that said though, I did not want XP to sneak back in so I asked Cory Becht to develop a script to notify when a new XP system joins the domain. If a new XP system is found, it emails myself and the Global IT leads so they can run down why its around for whatever reason and develop a plan to refresh it to Windows 7.

The email gives some basic info from AD to hopefully give you clues on its whereabouts. It will additionally attempt to do a lookup from DNS to also help track it down.

 Computer LAP1Q2W3E4 running Windows XP Professional is new and is found at:  
   my.domain.local/NorthAmerica/US/Laptops/LAP1Q2W3E4  
   IP Address: 10.10.10.102 AD Site: US  

Simply run as a scheduled task as the SYSTEM account. Be sure to run with 32-Bit cscript if your using a 64-Bit OS. Just update the first several lines for your environment as shown below. We run it once a day.

2:  strEmails = "[email protected];[email protected]"  'separate with semi-colon  
3:  strSMTPServer = "smtpsmarthost.my.domain.local"  
5:  strDomainLDAP = "dc=my,dc=domain,dc=local"  
6:  strDomainFQDN = "my.domain.local"  
7:  strSMTPDomain = "my.domain.local" 'if the from address domain is different  

Theres an Access Database (XP.mdb) that's used to keep track of found systems for performance. Additionally you can modify line 17 for other operating systems. I have one looking for Windows 8 systems.

Download

This script is provided as-is, no warranty is provided or implied.The author is NOT responsible for any damages or data loss that may occur through the use of this script.  Always test, test, test before rolling anything into a production environment.

You can download it from here.

Bonus

We also modified an older version to notify on Servers joining the domain. With thousands of servers we have had cases where a server was not added to backup cycles or some other mishap. This script emails the server support teams so they can setup backup schedules or whatever is needed. Even have used it to catch some systems as having the wrong edition or version of Windows Server.

 Server MDT01 running Windows Server 2012 R2 Standard is new and is found at:   
 my.domain.local/Computers/MDT01  

That script can also be found above. You will have to modify the same parts as above for your environment.


Wednesday, February 12, 2014

My Image Mule

While attending SCU 2014 (at the Alamo in Denver) someone mentioned using SSD during their presentation and it brought up some conversations in our audience about using SSDs for deployment testing so I thought I would share what we use for our deployment testing. I fondly call these systems our 'Imaging Mules'. What takes over an hour on a fast desktop takes about 15 minutes. Much quicker time frames to test new scripts, wrappers, packages, etc.

For the hardware we took our design workstation standard at the time, a Dell Precision T3600, with 16GB memory, 1TB spindle, and i7 proc and made a few tweaks. We modified the spec by using a 2x250GB HDD RAID0 and removed the nVidia Quadro video card for the cheapest one Dell would put in it, but left it alone otherwise. The 2x250GB is the host OS volume (C) and is Windows 7, and is my primary system even. Once they arrived we bought a bunch of 120GB SSDs, 4 for each system. All the VMs (we use VMWare Workstation), live on a 4x120GB SATAIII SSD RAID0 volume (D). To mount them we obtained several of these adapters. They allow us to mount four 2.5" SSD drives in a 5.25" (optical) bay. The cheap fan died in a couple of them but they are not needed with SSD's so i just unplugged it. For the PERC H310 we had to get another cable to support the SATA drives.

Its pretty spanking fast. Doing some testing I got the following read speeds. These are raw reads and I did not perform any write tests unfortunately. If I have to rebuild that volume I'll do some RO and RW test and update this blog post. Taking over an hour deployment task sequence down to 15-20 minutes is enough results anyhow!

RO Speed Model Storage Configuration
142.5MB Dell Precision T3600 1TB Spinner
221.4MB Dell Precision T3600 2x250GB Spinners RAID0
1.7GB Dell Precision T3600 4x120GB SSD RAID0

The 1.7GB is from Samsumg 840 drives. We have some kingstons that gived 1.1GB read. I've had over a dozen VMs all deploying concurrently with little lag. Note that I'm just doing deployments so the 480GB volume is more then enough since we generally dont put user type data in them. Additionally for the host OS I moved TEMP, TMP, and swap to the SSD RAID0. All in all, you can build a super fast image testing box for deployment testing pretty reasonable.

I've since found an adapter that holds six drives and put that into my GENTOO server at home. 

Tuesday, February 4, 2014

Task Sequence and System Restore

This is an old one (2010) that I don't think many people know about as I was asked by some people recently. When deploying an asset via OSD, System Restore is running so anything that requests it such as Office will get a snapshot. MDT has mechanisms to disable and restore however OSD does not.

I disable System restore during capture then turn it back on as a final step during deployment. Its done for performance as the deployment is sped up greatly as the OS doesn't do snapshots. I actually have had a person do a System Restore back to within the TS, messy to say the least. So my solution is to disable it then re-enable it.

As mentioned previously, I do a Build and Capture TS that installs the OS WIM, does a few things, patches it and captures it each quarter. One of the "few things" I do is to disable System Restore. Disabling it in the B&C also keeps the WIM used to deploy smaller for easier replication. It is the first thing ran after the 'Setup Windows and Configuration Manager' step.

During a deployment TS, it is one of the last things to be ran, I have it before USMT.


You can find the Enable Script here and the Disable script here over at the Script Center.